2022年6月にShopifyアプリ開発のチュートリアルが刷新されたため、内容を徹底解説していきます。
2022年12月にShopifyアプリ開発のテンプレートとチュートリアルが更新されました。
そのため、この記事と最新版(2023年版)とに差異があります。
2023年8月のShopify Summer Edition'23 で、Shopifyアプリ開発のテンプレートがRemixフレームワークに変更されました。
最新版を学習されたい方は下記にリンクをご確認ください。
2時間
前提条件
- パートナーアカウントと開発ストアを準備済み
- Node.js 14.13.1以降をインストール済み
- npmまたはyarnをインストール済み
- Gitをインストール済み
- ngrokのアカウントを登録済み
- Ruby 3.0以降とbundler 2.0以降をインストール済み (2022/10/20追記)
前提知識
- React.js, Vite, Next.jsの基本知識
- Node.js, Express
- データベースやSQLの知識
- APIの基礎知識(認証系など)
∟ GraphQL API, REST API を含む
公式サイト

では、早速解説していきます!Shopifyのアプリ開発を楽しみましょう!
- アプリの構築
- ローカル開発サーバーを起動
- QRコード生成アプリを作ろう
- フロントエンドの構築
- QRコード生成ページ
- ページのルーティングについて
- QRコード生成ページ – 新規作成
- QRコード生成ページ – 編集
- ホームページにリストコンポーネントを追加する
- バックエンドの構築
- DBを構成する
- APIレイヤーを追加する
- フロントエンドからのAPIリクエストを処理するミドルウェア
- DBとAPIエンドポイントをサーバーに接続する
- データのフェッチ
- QRコードを保存する
- QRコードの保存
- QRコードの削除
- 割引の処理ロジックを構築
- フロントエンドとバッっくエンドのコードを接続して、割引を表示および選択
- リストビューを接続して、保存されたQRコードを表示
- QRコード画像のコードを追加する
- 動作テスト
アプリの構築
まずは作業するディレクトリを決めて、ターミナルで次のコマンドを入力します。
今までは、HomebrewなどでShopify CLI v2をインストールしなければ行けませんでしたが、Shopify CLI 3からは事前にインストールする必要はなく、またアプリごとにCLIを変更することも可能となりました。
$ yarn create @shopify/app --template node
=> アプリ名を登録してください
インストールされたテンプレートを見るとわかりますが、このコマンド一つでほとんどの初期設定が完了してしまいます。
テンプレートのwebディレクトリ配下には、
・開発ストアに製品を追加できるReact.jsフロントエンド
・ShopifyRESTおよびGraphQL管理APIと対話する準備ができているNode.jsバックエンド
が構築されいます。
ローカル開発サーバーを起動
ngrokを使用して、ローカル環境にサーバーを構築します。
$ yarn dev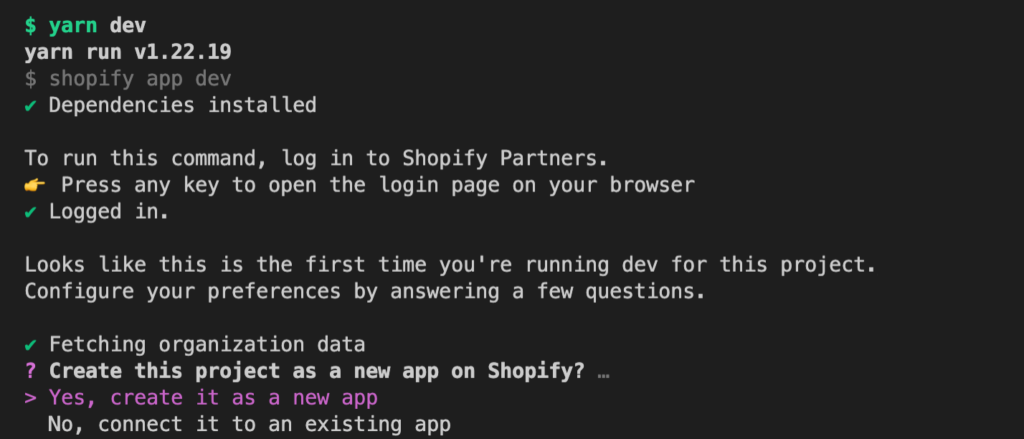
今回は、パートナーダッシュボードに新しくアプリを作成します。
アプリ名は任意に設定できますが今回は「new-tutorial-app」という名前にしました。
インストール先の開発ストアを選択すると、nodemonでサーバーが立ち上がります。
次に、開発ストアへこのアプリをインストールしましょう。
ターミナルの赤枠のURLをみてください。
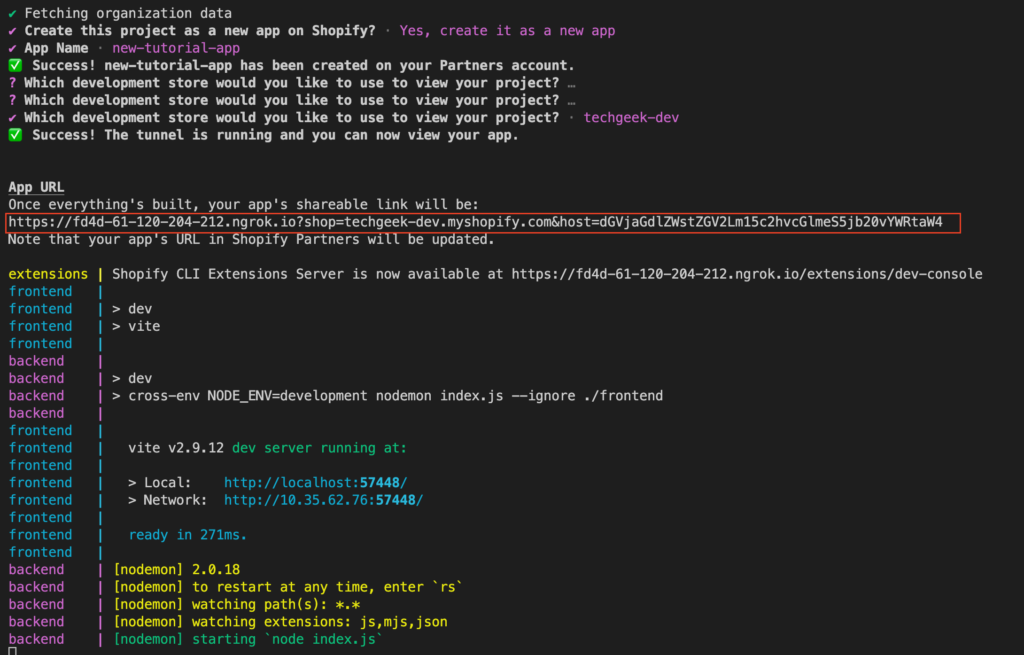
赤枠のApp URLにアクセスすると先ほどインストール先に選択したストアにアクセスし、インストールが画面が表示され
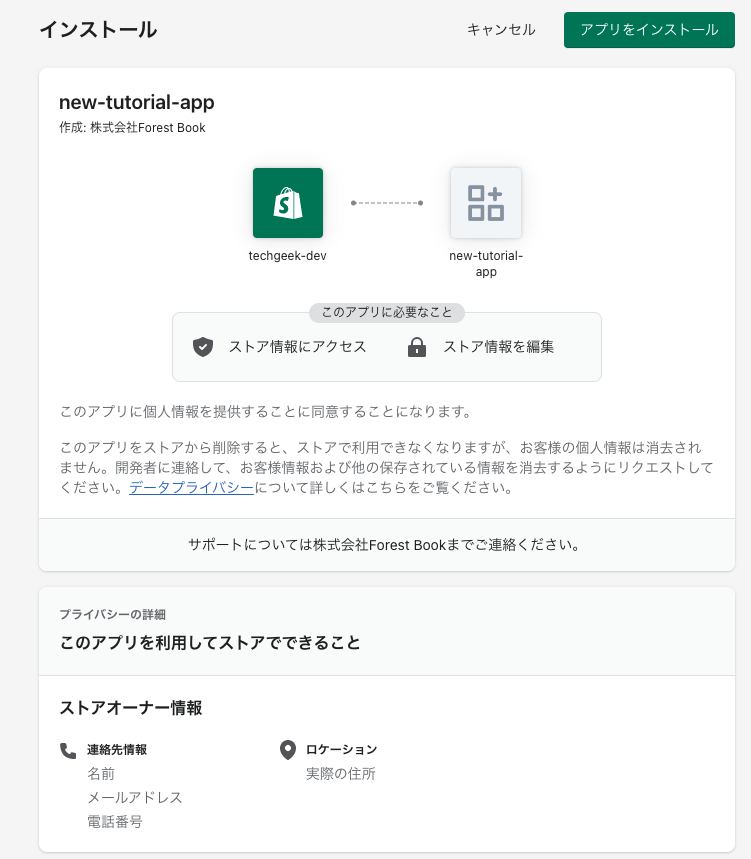
インストールが完了すると、このようなアプリを作成されます。
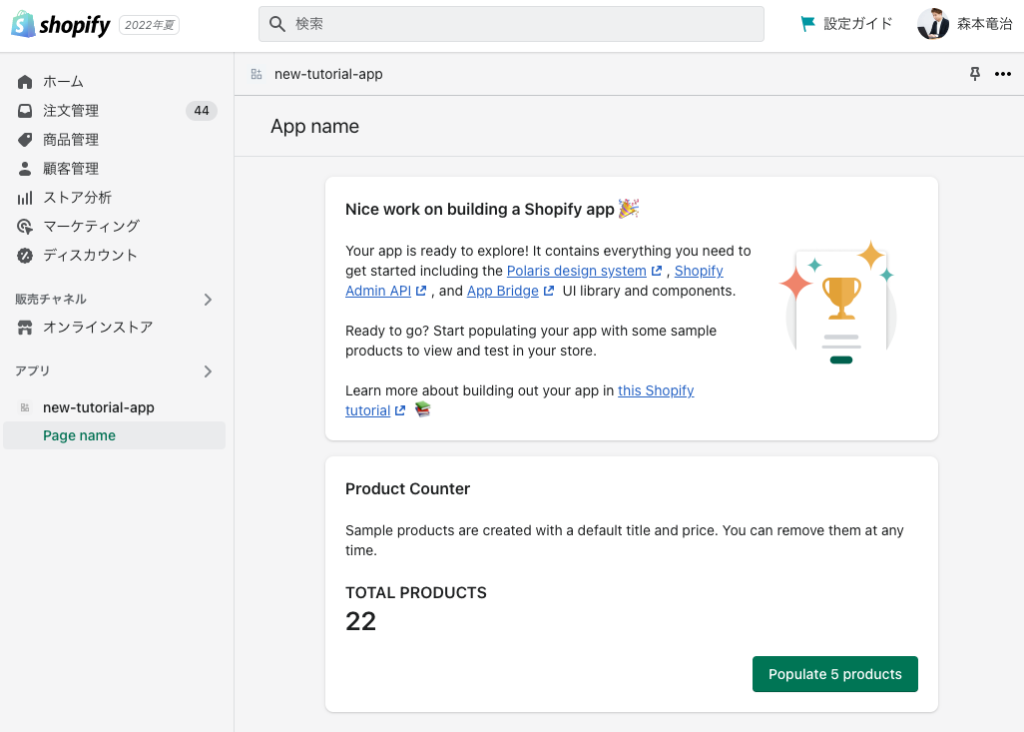
たったこれだけで、アプリの作成、インストールまで完了しました!
本当に素晴らしいと思います。
このアプリは「Populate 5 products」をクリックすると、デモ商品が5つ登録される機能があります。ちなみに、登録された商品は、販売チャネルの設定がないため、実際に表示する場合は商品管理ページの「販売チャネルとアプリ」>「管理」から設定することが必要です。
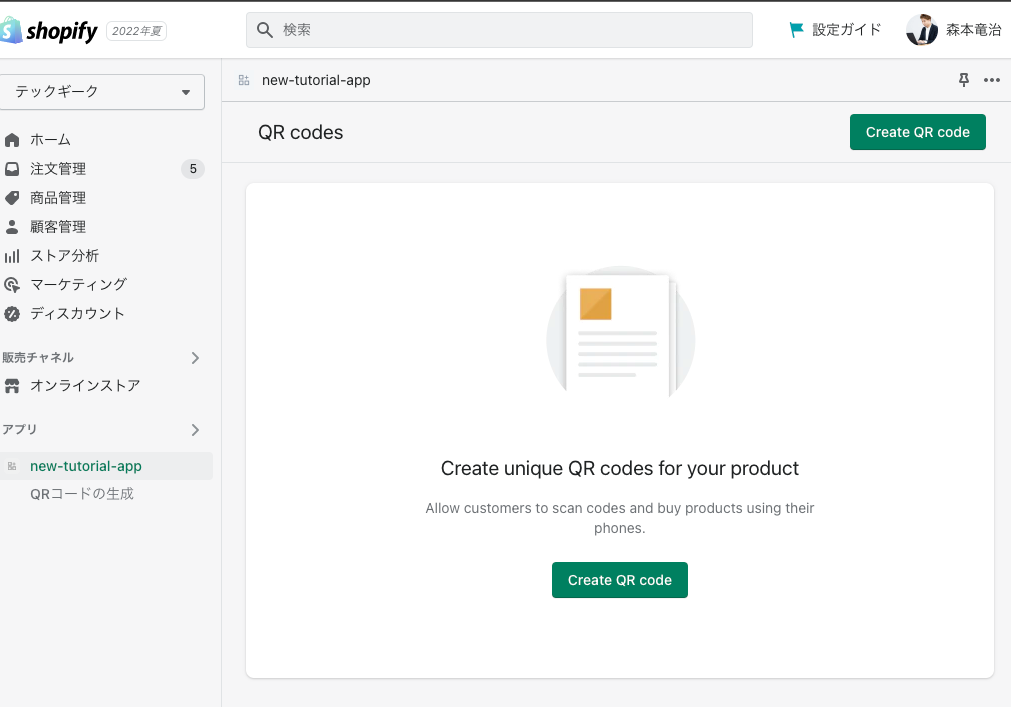
QRコード生成アプリを作ろう
これでチュートリアルの解説が完了です、と言えたらいいのですがこの後は実際にどのように開発を進めればいいのでしょうか?
安心してください!
実際にアプリを開発する手順を今から解説します。
Shopifyアプリの開発には、共通する設計パターン、コンポーネント、機能をしっかりと理解しなくてはなりません。
そのために、デモアプリとしてQRコード生成アプリを作成していきましょう。
このQRコード生成アプリは、特定の商品に対してディスカウントコードを付与したURL(QRコード)を生成する機能を持ちます。

https://shopify.dev/apps/getting-started/build-app-example
このアプリでは、
を使用します。この2つのライブラリの詳細は解説しないので、詳細を知りたい場合は公式ドキュメントをご参照ください。
また、このサンプルアプリは GitHub 上で公開されています。
フロントエンドの構築
構築する内容は、
- QRコードの表示
- QRコードの作成
- QRコードの編集
のページです。
Polarisコンポーネントを使ってこれらを構築していきます。
フロントエンドの構築は、 /web/frontend ディレクトリ配下で行います。
ディレクトリ構成はとても大切なので、フロントエンドはfrontendディレクトリ配下で作業することを忘れないようにしてください。
早速コードを編集しましょう。
元々記載されているコードは全て削除して、上書きしてください。
/web/frontend/pages/index.jsx
import { useNavigate, TitleBar, Loading } from '@shopify/app-bridge-react'
import { Card, EmptyState, Layout, Page, SkeletonBodyText } from '@shopify/polaris'

export default function HomePage() {
  /*
  Add an App Bridge useNavigate hook to set up the navigate function.
  This function modifies the top-level browser URL so that you can
  navigate within the embedded app and keep the browser in sync on reload.
  */
  const navigate = useNavigate()

  /*
    These are mock values. Setting these values lets you preview the loading markup and the empty state.
  */
  const isLoading = true
  const isRefetching = false
  const QRCodes = []

  /* loadingMarkup uses the loading component from AppBridge and components from Polaris  */
  const loadingMarkup = isLoading ? (
    <Card sectioned>
      <Loading />
      <SkeletonBodyText />
    </Card>
  ) : null

  /* Use Polaris Card and EmptyState components to define the contents of the empty state */
  const emptyStateMarkup =
    !isLoading && !QRCodes?.length ? (
      <Card sectioned>
        <EmptyState
          heading="Create unique QR codes for your product"
          /* This button will take the user to a Create a QR code page */
          action={{
            content: 'Create QR code',
            onAction: () => navigate('/qrcodes/new'),
          }}
          image="https://cdn.shopify.com/s/files/1/0262/4071/2726/files/emptystate-files.png"
        >
          <p>
            Allow customers to scan codes and buy products using their phones.
          </p>
        </EmptyState>
      </Card>
    ) : null

  /*
    Use Polaris Page and TitleBar components to create the page layout,
    and include the empty state contents set above.
  */
  return (
    <Page>
      <TitleBar
        title="QR codes"
        primaryAction={{
          content: 'Create QR code',
          onAction: () => navigate('/qrcodes/new'),
        }}
      />
      <Layout>
        <Layout.Section>
          {loadingMarkup}
          {emptyStateMarkup}
        </Layout.Section>
      </Layout>
    </Page>
  )
}
コードを編集したら、サーバーを立ち上げてください。
$ yarn dev
このようにローディング中の表示がされれば正常に動作しています。
これで構築準備は完了です。
次にQRコードの生成ページを構築していきます。
QRコード生成ページ
QRコードの生成には、「@shopify/react-form」ライブラリを利用します。
フォームの機能はとても複雑で多岐に渡ります。
そして、どのフォームも似たような機能を必要としています。
特別な理由がない限り、ライブラリを利用してフォームを構築することは理にかなった手段です。
有名なフォームライブラリはいくつかありますが、ここではPolarisに最適化された@shopify/react-formを採用しています。
早速、ライブラリをインストールしましょう。
Ctrl + Cでサーバーを落として、必ず/web/frontendディレクトリにインストールしてください。
$ cd web/frontend
$ yarn add @shopify/react-form
次にフォームコンポーネントを作成していきます。
React.jsのコンポーネントの概念は、React ドキュメントを参照し理解してください。
// web/frontendディレクトリで入力
$ touch components/QRCodeForm.jsx
web/frontend/components/QRCodeForm.jsx に次のコードを記載します。
import { useState, useCallback } from 'react'
import {
Banner,
Card,
Form,
FormLayout,
TextField,
Button,
ChoiceList,
Select,
Thumbnail,
Icon,
Stack,
TextStyle,
Layout,
EmptyState,
} from '@shopify/polaris'
import {
ContextualSaveBar,
ResourcePicker,
useAppBridge,
useNavigate,
} from '@shopify/app-bridge-react'
import { ImageMajor, AlertMinor } from '@shopify/polaris-icons'
/* Import the useAuthenticatedFetch hook included in the Node app template */
import { useAuthenticatedFetch, useShopifyQuery } from '../hooks'
/* Import custom hooks for forms */
import { useForm, useField, notEmptyString } from '@shopify/react-form'
const NO_DISCOUNT_OPTION = { label: 'No discount', value: '' }
/*
The discount codes available in the store.
This variable will only have a value after retrieving discount codes from the API.
*/
const DISCOUNT_CODES = {}
export function QRCodeForm({ QRCode: InitialQRCode }) {
const [QRCode, setQRCode] = useState(InitialQRCode)
const [showResourcePicker, setShowResourcePicker] = useState(false)
const [selectedProduct, setSelectedProduct] = useState(QRCode?.product)
const navigate = useNavigate()
const appBridge = useAppBridge()
const fetch = useAuthenticatedFetch()
const deletedProduct = QRCode?.product?.title === 'Deleted product'
/*
This is a placeholder function that is triggered when the user hits the "Save" button.
It will be replaced by a different function when the frontend is connected to the backend.
*/
const onSubmit = (body) => console.log('submit', body)
/*
Sets up the form state with the useForm hook.
Accepts a "fields" object that sets up each individual field with a default value and validation rules.
Returns a "fields" object that is destructured to access each of the fields individually, so they can be used in other parts of the component.
Returns helpers to manage form state, as well as component state that is based on form state.
*/
const {
fields: {
title,
productId,
variantId,
handle,
discountId,
discountCode,
destination,
},
dirty,
reset,
submitting,
submit,
makeClean,
} = useForm({
fields: {
title: useField({
value: QRCode?.title || '',
validates: [notEmptyString('Please name your QR code')],
}),
productId: useField({
value: deletedProduct ? 'Deleted product' : (QRCode?.product?.id || ''),
validates: [notEmptyString('Please select a product')],
}),
variantId: useField(QRCode?.variantId || ''),
handle: useField(QRCode?.handle || ''),
destination: useField(
QRCode?.destination ? [QRCode.destination] : ['product']
),
discountId: useField(QRCode?.discountId || NO_DISCOUNT_OPTION.value),
discountCode: useField(QRCode?.discountCode || ''),
},
onSubmit,
})
const QRCodeURL = QRCode ? new URL(
`/qrcodes/${QRCode.id}/image`,
location.toString()
).toString() : null
/*
This function is called with the selected product whenever the user clicks "Add" in the ResourcePicker.
It takes the first item in the selection array and sets the selected product to an object with the properties from the "selection" argument.
It updates the form state using the "onChange" methods attached to the form fields.
Finally, closes the ResourcePicker.
*/
const handleProductChange = useCallback(({ selection }) => {
setSelectedProduct({
title: selection[0].title,
images: selection[0].images,
handle: selection[0].handle,
})
productId.onChange(selection[0].id)
variantId.onChange(selection[0].variants[0].id)
handle.onChange(selection[0].handle)
setShowResourcePicker(false)
}, [])
/*
This function updates the form state whenever a user selects a new discount option.
*/
const handleDiscountChange = useCallback((id) => {
discountId.onChange(id)
discountCode.onChange(DISCOUNT_CODES[id] || '')
}, [])
/*
This function is called when a user clicks "Select product" or cancels the ProductPicker.
It switches between a show and hide state.
*/
const toggleResourcePicker = useCallback(
() => setShowResourcePicker(!showResourcePicker),
[showResourcePicker]
)
/*
This is a placeholder function that is triggered when the user hits the "Delete" button.
It will be replaced by a different function when the frontend is connected to the backend.
*/
const isDeleting = false
const deleteQRCode = () => console.log('delete')
/*
This function runs when a user clicks the "Go to destination" button.
It uses data from the App Bridge context as well as form state to construct destination URLs using the URL helpers you created.
*/
const goToDestination = useCallback(() => {
if (!selectedProduct) return
const data = {
host: appBridge.hostOrigin,
productHandle: handle.value || selectedProduct.handle,
discountCode: discountCode.value || undefined,
variantId: variantId.value,
}
const targetURL = deletedProduct || destination.value[0] === 'product'
? productViewURL(data)
: productCheckoutURL(data)
window.open(targetURL, '_blank', 'noreferrer,noopener')
}, [QRCode, selectedProduct, destination, discountCode, handle, variantId])
/*
This array is used in a select field in the form to manage discount options.
It will be extended when the frontend is connected to the backend and the array is populated with discount data from the store.
For now, it contains only the default value.
*/
const isLoadingDiscounts = true;
const discountOptions = [NO_DISCOUNT_OPTION]
/*
These variables are used to display product images, and will be populated when image URLs can be retrieved from the Admin.
*/
const imageSrc = selectedProduct?.images?.edges?.[0]?.node?.url
const originalImageSrc = selectedProduct?.images?.[0]?.originalSrc
const altText =
selectedProduct?.images?.[0]?.altText || selectedProduct?.title
/* The form layout, created using Polaris and App Bridge components. */
return (
<Stack vertical>
{deletedProduct && <Banner
title='The product for this QR code no longer exists.'
status='critical'
>
<p>
Scans will be directed to a 404 page, or you can choose another product for this QR code.
</p>
</Banner>}
<Layout>
<Layout.Section>
<Form>
<ContextualSaveBar
saveAction={{
label: 'Save',
onAction: submit,
loading: submitting,
disabled: submitting,
}}
discardAction={{
label: 'Discard',
onAction: reset,
loading: submitting,
disabled: submitting,
}}
visible={dirty}
fullWidth
/>
<FormLayout>
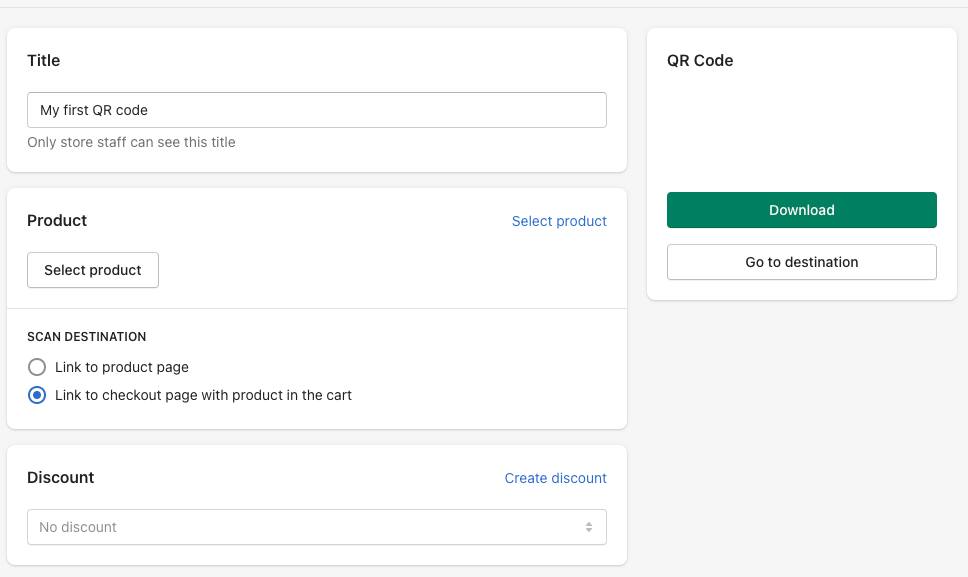
<Card sectioned title='Title'>
<TextField
{...title}
label='Title'
labelHidden
helpText='Only store staff can see this title'
/>
</Card>
<Card
title='Product'
actions={[
{
content: productId.value
? 'Change product'
: 'Select product',
onAction: toggleResourcePicker,
},
]}
>
<Card.Section>
{showResourcePicker && (
<ResourcePicker
resourceType='Product'
showVariants={false}
selectMultiple={false}
onCancel={toggleResourcePicker}
onSelection={handleProductChange}
open
/>
)}
{productId.value ? (
<Stack alignment='center'>
{(imageSrc || originalImageSrc) ? (
<Thumbnail
source={imageSrc || originalImageSrc}
alt={altText}
/>
) : (
<Thumbnail source={ImageMajor} color='base' size='small' />
)}
<TextStyle variation='strong'>
{selectedProduct.title}
</TextStyle>
</Stack>
) : (
<Stack vertical spacing='extraTight'>
<Button onClick={toggleResourcePicker}>
Select product
</Button>
{productId.error && (
<Stack spacing='tight'>
<Icon source={AlertMinor} color='critical' />
<TextStyle variation='negative'>
{productId.error}
</TextStyle>
</Stack>
)}
</Stack>
)}
</Card.Section>
<Card.Section title='Scan Destination'>
<ChoiceList
title='Scan destination'
titleHidden
choices={[
{ label: 'Link to product page', value: 'product' },
{
label: 'Link to checkout page with product in the cart',
value: 'checkout',
},
]}
selected={destination.value}
onChange={destination.onChange}
/>
</Card.Section>
</Card>
<Card
sectioned
title='Discount'
actions={[
{
content: 'Create discount',
onAction: () =>
navigate(
{
name: 'Discount',
resource: {
create: true,
},
},
{ target: 'new' }
),
},
]}
>
<Select
label='discount code'
options={discountOptions}
onChange={handleDiscountChange}
value={discountId.value}
disabled={isLoadingDiscounts || discountsError}
labelHidden
/>
</Card>
</FormLayout>
</Form>
</Layout.Section>
<Layout.Section secondary>
<Card sectioned title='QR Code'>
{QRCode ? (
<EmptyState
imageContained={true}
image={QRCodeURL}
/>
) : (
<EmptyState>
<p>Your QR code will appear here after you save.</p>
</EmptyState>
)}
<Stack vertical>
<Button fullWidth primary download url={QRCodeURL} disabled={!QRCode || isDeleting}>
Download
</Button>
<Button
fullWidth
onClick={goToDestination}
disabled={!selectedProduct}
>
Go to destination
</Button>
</Stack>
</Card>
</Layout.Section>
<Layout.Section>
{QRCode?.id && (
<Button
outline
destructive
onClick={deleteQRCode}
loading={isDeleting}
>
Delete QR code
</Button>
)}
</Layout.Section>
</Layout>
</Stack>
)
}
/* Builds a URL to the selected product */
function productViewURL({ host, productHandle, discountCode }) {
const url = new URL(host)
const productPath = `/products/${productHandle}`
/*
If a discount is selected, then build a URL to the selected discount that redirects to the selected product: /discount/{code}?redirect=/products/{product}
*/
if (discountCode) {
url.pathname = `/discount/${discountCode}`
url.searchParams.append('redirect', productPath)
} else {
url.pathname = productPath
}
return url.toString()
}
/* Builds a URL to a checkout that contains the selected product */
function productCheckoutURL({
host,
variantId,
quantity = 1,
discountCode,
}) {
const url = new URL(host)
const id = variantId.replace(
/gid:\/\/shopify\/ProductVariant\/([0-9]+)/,
'$1'
)
url.pathname = `/cart/${id}:${quantity}`
/*
Builds a URL to a checkout that contains the selected product with a discount code applied
*/
if (discountCode) {
url.searchParams.append('discount', discountCode)
}
return url.toString()
}QRCodeFormコンポーネントが完成したのでコンポーネントインデックスに含めます。
/web/frontend/components/index.js
export { ProductsCard } from "./ProductsCard";
export * from "./providers";
export { QRCodeForm } from './QRCodeForm' // 追記
次にページ自体を作成していきます。
フォームを表示するページです。
作成するページは、新規作成ページと編集ページです。
-
/web/frontend/pages/qrcodes/new.jsx:新規作成ページ -
/web/frontend/pages/qrcodes/[id].jsx:編集ページ
// web/frontendディレクトリで入力
$ mkdir pages/qrcodes
$ touch pages/qrcodes/new.jsx
$ touch pages/qrcodes/\[id\].jsx
ページのルーティングについて
このサンプルアプリでは、ファイルベースのルーティングを使用しています。
これは、明らかにNext.jsの考え方を採用しています。
Next.jsは素晴らしいフルスタックフレームワークですが、Shopifyアプリに利用するにはいくつかの課題があります。
Shopify本社のエンジニアがどのように考えているかはわかりませんが、Next.jsをフレームワークに採用せず独自に同様の機能を構築することで、デメリットを回避しつつ素晴らしいメリットを採用したサンプルコードになっていると言えます。(主観的意見ですが)
ここではファイルベースのルーティングについて概要しか解説しないので、わからない方はNext.js公式チュートリアルに取り組んでください。
ファイルベースのルーティングは、web/frontend/Routes.jsx で設計されています。
これにより、/web/frontend/pages ディレクトリ配下の .jsx ファイル名がURLになります。
例えば、 URLが “ドメイン/qrcodes/new” ならば、/web/frontend/pages/qrcodes/new.jsxにレンダリングされます。
もし、入力されたURLとファイル名が一致しなければ、 /pages/NotFound.jsx にレンダリングされます。
ところで、[id].jsxというファイル名は少し特殊で、ブラケットで囲まれたファイル名の場合、一意のURLに対応します。
詳細はNext.jsのチュートリアルに任せます。
QRコード生成ページ – 新規作成
/web/frontend/pages/qrcodes/new.jsx に次のコードを記載します。
import { Page } from '@shopify/polaris'
import { TitleBar } from '@shopify/app-bridge-react'
import { QRCodeForm } from '../../components'

export default function ManageCode() {
  const breadcrumbs = [{content: 'QR codes', url: '/' }]

  return (
    <Page>
      <TitleBar
        title="Create new QR code"
        breadcrumbs={breadcrumbs}
        primaryAction={null}
      />
      <QRCodeForm />
    </Page>
  )
}
ページのルーティングを変更しましょう。
web/frontend/App.jsx を開いて、 navigationLinksを変更します。
全体のコードとしては次のようになります。
import { BrowserRouter } from "react-router-dom";
import { NavigationMenu } from "@shopify/app-bridge-react";
import Routes from "./Routes";

import {
  AppBridgeProvider,
  GraphQLProvider,
  PolarisProvider,
} from "./components";

export default function App() {
  // Any .tsx or .jsx files in /pages will become a route
  // See documentation for <Routes /> for more info
  const pages = import.meta.globEager("./pages/**/!(*.test.[jt]sx)*.([jt]sx)");

  return (
    <PolarisProvider>
      <BrowserRouter>
        <AppBridgeProvider>
          <GraphQLProvider>
            <NavigationMenu
              navigationLinks={[
                {
                  label: "QRコードの生成",
                  destination: "/qrcodes/new",
                },
              ]}
            />
            <Routes pages={pages} />
          </GraphQLProvider>
        </AppBridgeProvider>
      </BrowserRouter>
    </PolarisProvider>
  );
}
これで新規作成ページは完成です。
早速、サーバーを起動して確認してみましょう。
サーバーの起動は、アプリのルートディレクトリで実行してください。
// アプリのルートディレクトリで実行してください
$ yarn dev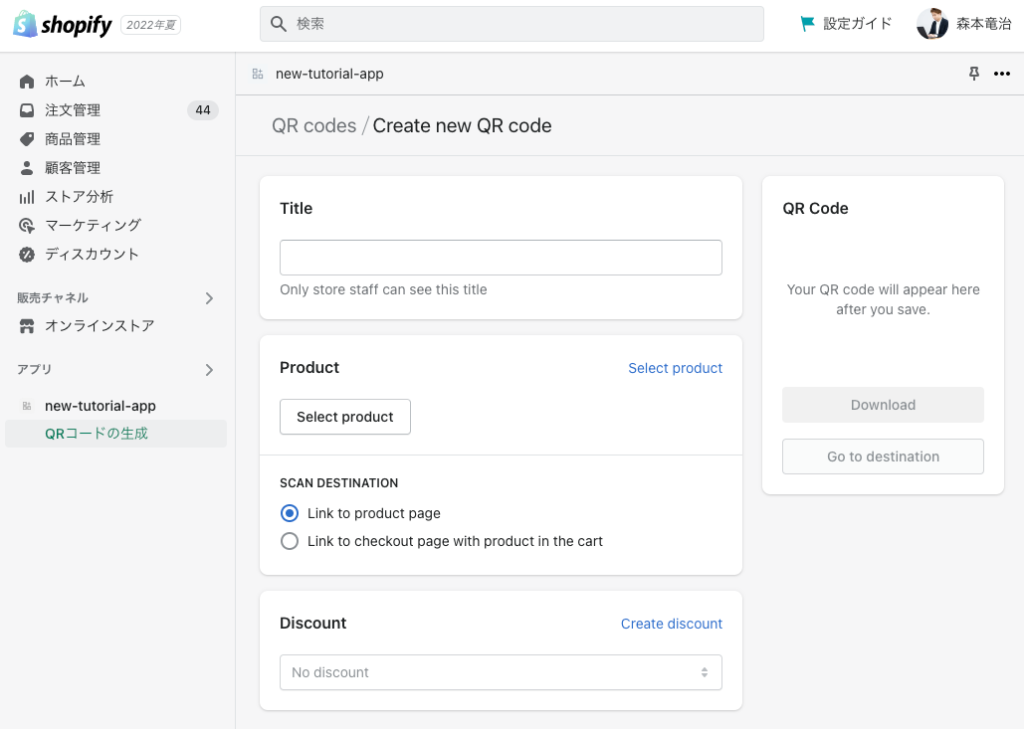
タイトルの入力や商品の選択などができれば新規作成ページは完成です。
まだ、バックエンド処理を作成していないので、実際にQRコードの生成、保存はできません。
QRコード生成ページ – 編集
編集では、新規作成と同じコンポーネントを使い、編集情報をデータベース(以下DBと略す)からデータ取得します。
今回、バックエンド処理を未構築なため、モックデータを使用して期待通りに表示されるかを確認します。
早速、先ほど作成した/web/frontend/pages/qrcodes/[id].jsx に次のコードを記載しましょう。
import { Card, Page, Layout, SkeletonBodyText } from '@shopify/polaris'
import { Loading, TitleBar } from '@shopify/app-bridge-react'
import { QRCodeForm } from '../../components'

export default function QRCodeEdit() {
  const breadcrumbs = [{content: 'QR codes', url: '/' }]

  /*
     These are mock values.
     Set isLoading to false to preview the page without loading markup.
  */
  const isLoading = false
  const isRefetching = false
  const QRCode = {
    createdAt: '2022-06-13',
    destination: 'checkout',
    title: 'My first QR code',
    product: {}
  }

  /* Loading action and markup that uses App Bridge and Polaris components */
  if (isLoading || isRefetching) {
    return (
      <Page>
        <TitleBar title="Edit QR code" breadcrumbs={breadcrumbs} primaryAction={null} />
        <Loading />
        <Layout>
          <Layout.Section>
            <Card sectioned title="Title">
              <SkeletonBodyText />
            </Card>
            <Card title="Product">
              <Card.Section>
                <SkeletonBodyText lines={1} />
              </Card.Section>
              <Card.Section>
                <SkeletonBodyText lines={3} />
              </Card.Section>
            </Card>
            <Card sectioned title="Discount">
              <SkeletonBodyText lines={2} />
            </Card>
          </Layout.Section>
          <Layout.Section secondary>
            <Card sectioned title="QR code" />
          </Layout.Section>
        </Layout>
      </Page>
    )
  }

  return (
    <Page>
      <TitleBar title="Edit QR code" breadcrumbs={breadcrumbs} primaryAction={null} />
      <QRCodeForm QRCode={QRCode} />
    </Page>
  )
}
ブラウザでアプリのホームページからURLを更新してQRコードの編集ページを確認します。
次のような入力をしてください。
https://{shop}.myshopify.com/apps/{app-name}/qrcodes/1
{shop}や{app-name}は、ご自身の環境に合わせて適宜変更してください。
このような表記になっていればOKです。
ホームページにリストコンポーネントを追加する
フロントエンドの最後の構築は、作成したQRコードを一覧表示するインデックスページを作成することです。
これまでと同様に、コンポーネントを作成し、インデックスページに読み込ませます。
ここで、リストコンポーネントを作成するためにいくつか追加のライブラリを読み込みます。
// web/frontendディレクトリで入力してください。
$ cd web/frontend
$ yarn add @shopify/react-hooks dayjs
新しいコンポーネントとして、QRCodeIndex.jsxを作成してください。
$ touch components/QRCodeIndex.jsxQRCodeIndex.jsxに次のコードを挿入します。
import { useNavigate } from '@shopify/app-bridge-react'
import { Card, Icon, IndexTable, Stack, TextStyle, Thumbnail, UnstyledLink } from '@shopify/polaris'
import { DiamondAlertMajor, ImageMajor } from '@shopify/polaris-icons'

/* useMedia is used to support multiple screen sizes */
import { useMedia } from '@shopify/react-hooks'

/* dayjs is used to capture and format the date a QR code was created or modified */
import dayjs from 'dayjs'

/* Markup for small screen sizes (mobile) */
function SmallScreenCard({ id, title, product, discountCode, scans, createdAt, navigate }) {
  return (
    <UnstyledLink onClick={() => navigate(`/qrcodes/${id}`)}>
      <div style={{ padding: '0.75rem 1rem', borderBottom: '1px solid #E1E3E5' }}>
        <Stack>
          <Stack.Item>
            <Thumbnail
              source={product?.images?.edges[0]?.node?.url || ImageMajor}
              alt="placeholder"
              color="base"
              size="small"
            />
          </Stack.Item>
          <Stack.Item fill>
            <Stack vertical={true}>
              <Stack.Item>
              <p>
                <TextStyle variation="strong">{truncate(title, 35)}</TextStyle>
              </p>
              <p>{truncate(product?.title, 35)}</p>
              <p>{dayjs(createdAt).format('MMMM D, YYYY')}</p>
              </Stack.Item>
              <div style={{display: 'flex'}}>
                <div style={{flex: '3'}}>
                  <TextStyle variation="subdued">Discount</TextStyle>
                  <p>{discountCode || '-'}</p>
                </div>
                <div style={{flex: '2'}}>
                  <TextStyle variation="subdued">Scans</TextStyle>
                  <p>{scans}</p>
                </div>
              </div>
            </Stack>
          </Stack.Item>
        </Stack>
      </div>
    </UnstyledLink>
  )
}

export function QRCodeIndex({ QRCodes, loading }) {
  const navigate = useNavigate()

  /* Check if screen is small */
  const isSmallScreen = useMedia('(max-width: 640px)')

  /* Map over QRCodes for small screen */
  const smallScreenMarkup = QRCodes.map((QRCode) => (
    <SmallScreenCard key={QRCode.id} navigate={navigate} {...QRCode}/>
  ))

  const resourceName = {
    singular: 'QR code',
    plural: 'QR codes',
  }

  const rowMarkup = QRCodes.map(
    ({ id, title, product, discountCode, scans, createdAt }, index) => {
      const deletedProduct = product.title.includes('Deleted product')

      /* The form layout, created using Polaris components. Includes QR code data set above. */
      return (
        <IndexTable.Row
          id={id}
          key={id}
          position={index}
          onClick={() => {
            navigate(`/qrcodes/${id}`)
          }}
        >
          <IndexTable.Cell>
            <Thumbnail
              source={product?.images?.edges[0]?.node?.url || ImageMajor}
              alt="placeholder"
              color="base"
              size="small"
            />
          </IndexTable.Cell>
          <IndexTable.Cell>
            <UnstyledLink data-primary-link url={`/qrcodes/${id}`}>
              {truncate(title, 30)}
            </UnstyledLink>
          </IndexTable.Cell>
          <IndexTable.Cell>
            <Stack>
              {deletedProduct && <Icon source={DiamondAlertMajor} color="critical" />}
              <TextStyle variation={deletedProduct ? "negative" : null}>
              {truncate(product?.title, 30)}
              </TextStyle>
            </Stack>
          </IndexTable.Cell>
          <IndexTable.Cell>{discountCode}</IndexTable.Cell>
          <IndexTable.Cell>
            {dayjs(createdAt).format('MMMM D, YYYY')}
          </IndexTable.Cell>
          <IndexTable.Cell>{scans}</IndexTable.Cell>
        </IndexTable.Row>
      )
    }
  )

  /* A layout for small screens, built using Polaris components */
  return (
    <Card>
      {isSmallScreen ? smallScreenMarkup : (
        <IndexTable
          resourceName={resourceName}
          itemCount={QRCodes.length}
          headings={[
            { title: 'Thumbnail', hidden: true },
            { title: 'Title' },
            { title: 'Product' },
            { title: 'Discount' },
            { title: 'Date created' },
            { title: 'Scans' },
          ]}
          selectable={false}
          loading={loading}
          >
          {rowMarkup}
        </IndexTable>
      )}
    </Card>
  )
}

/* A function to truncate long strings */
function truncate(str, n) {
  return str.length > n ? str.substr(0, n - 1) + '…' : str
}
インデックスコンポーネントにリストコンポーネントを含めます。
/web/frontend/components/index.js
export { ProductsCard } from "./ProductsCard";
export * from "./providers";
export { QRCodeForm } from './QRCodeForm'
export { QRCodeIndex } from './QRCodeIndex' // 追記
インデックスページを次のように変更します。
/web/frontend/pages/index.jsx
import { useNavigate, TitleBar, Loading } from '@shopify/app-bridge-react'
import { Card, EmptyState, Layout, Page, SkeletonBodyText } from '@shopify/polaris'
import { QRCodeIndex } from '../components'

export default function HomePage() {
  const navigate = useNavigate()

  const isLoading = false
  const isRefetching = false
  const QRCodes = []

  const qrCodesMarkup = QRCodes?.length ? (
    <QRCodeIndex QRCodes={QRCodes} loading={isRefetching} />
  ) : null

  const loadingMarkup = isLoading ? (
    <Card sectioned>
      <Loading />
      <SkeletonBodyText />
    </Card>
  ) : null

  const emptyStateMarkup =
    !isLoading && !QRCodes?.length ? (
      <Card sectioned>
        <EmptyState
          heading="Create unique QR codes for your product"
          action={{
            content: 'Create QR code',
            onAction: () => navigate('/qrcodes/new'),
          }}
          image="https://cdn.shopify.com/s/files/1/0262/4071/2726/files/emptystate-files.png"
        >
          <p>
            Allow customers to scan codes and buy products using their phones.
          </p>
        </EmptyState>
      </Card>
    ) : null

  return (
    <Page>
      <TitleBar
        title="QR codes"
        primaryAction={{
          content: 'Create QR code',
          onAction: () => navigate('/qrcodes/new'),
        }}
      />
      <Layout>
        <Layout.Section>
          {loadingMarkup}
          {emptyStateMarkup}
          {qrCodesMarkup}
        </Layout.Section>
      </Layout>
    </Page>
  )
}
以上で、インデックスページにリストコンポーネントの設定は完了です!
アプリはまだバックエンド処理がないため、モックデータを使って動作確認を行います。
定数QRCodesの値を次のように更新してください。
const QRCodes = [
  {
    createdAt: '2022-06-13',
    destination: 'checkout',
    title: 'My first QR code',
    id: 1,
    discountCode: 'SUMMERDISCOUNT',
    product: {
      title: 'Faded t-shirt',
    }
  },
  {
    createdAt: '2022-06-13',
    destination: 'product',
    title: 'My second QR code',
    id: 2,
    discountCode: 'WINTERDISCOUNT',
    product: {
      title: 'Cozy parka',
    }
  },
  {
    createdAt: '2022-06-13',
    destination: 'product',
    title: 'QR code for deleted product',
    id: 3,
    product: {
      title: 'Deleted product',
    }
  },
]
サーバーを起動して次のような表示ができればOKです!
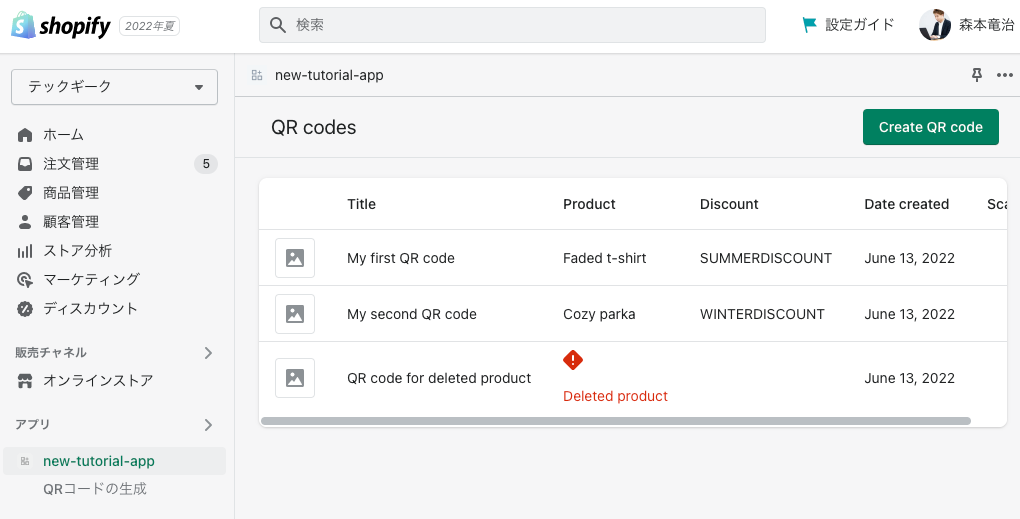
ここまででようやく半分完成ですね!🎉
まだまだ続きは長いので頑張りましょう!
バックエンドの構築
先延ばしにしていたバックエンドの構築をやっていきます!
今回必要なことは、
- QRコードの取得
- 保存
- 編集
- 削除
いわゆるCRUDを作成していきます。
また、DBとフロントエンドをバックエンドに接続するためのAPIレイヤーが必要になります。
ここでは、
- QRコードを保存するDBを構成する
- アプリのAPIレイヤーを追加する
を学習していきます。
DBを構成する
このチュートリアルではDBにSQLiteを使います。
実際の開発では、MySQLやPostgresQLなどを使うと思うので、適宜置き換えてください。
ちなみに自分はDynamoDB(NoSQL)を使っています。
/webディレクトリの配下にqr-codes-db.jsファイルを作成し、次のコードを追加します。
// webディレクトリで実行してください
$ touch qr-codes-db.js
web/qr-codes-db.js
/*
  This file interacts with the app's database and is used by the app's REST APIs.
*/

import sqlite3 from "sqlite3";
import path from "path";
import { Shopify } from "@shopify/shopify-api";

const DEFAULT_DB_FILE = path.join(process.cwd(), "qr_codes_db.sqlite");
const DEFAULT_PURCHASE_QUANTITY = 1;

export const QRCodesDB = {
  qrCodesTableName: "qr_codes",
  db: null,
  ready: null,

  create: async function ({
    shopDomain,
    title,
    productId,
    variantId,
    handle,
    discountId,
    discountCode,
    destination,
  }) {
    await this.ready;

    const query = `
      INSERT INTO ${this.qrCodesTableName}
      (shopDomain, title, productId, variantId, handle, discountId, discountCode, destination, scans)
      VALUES (?, ?, ?, ?, ?, ?, ?, ?, 0)
      RETURNING id;
    `;

    const rawResults = await this.__query(query, [
      shopDomain,
      title,
      productId,
      variantId,
      handle,
      discountId,
      discountCode,
      destination,
    ]);

    return rawResults[0].id;
  },

  update: async function (
    id,
    {
      title,
      productId,
      variantId,
      handle,
      discountId,
      discountCode,
      destination,
    }
  ) {
    await this.ready;

    const query = `
      UPDATE ${this.qrCodesTableName}
      SET
        title = ?,
        productId = ?,
        variantId = ?,
        handle = ?,
        discountId = ?,
        discountCode = ?,
        destination = ?
      WHERE
        id = ?;
    `;

    await this.__query(query, [
      title,
      productId,
      variantId,
      handle,
      discountId,
      discountCode,
      destination,
      id,
    ]);
    return true;
  },

  list: async function (shopDomain) {
    await this.ready;
    const query = `
      SELECT * FROM ${this.qrCodesTableName}
      WHERE shopDomain = ?;
    `;

    const results = await this.__query(query, [shopDomain]);

    return results.map((qrcode) => this.__addImageUrl(qrcode));
  },

  read: async function (id) {
    await this.ready;
    const query = `
      SELECT * FROM ${this.qrCodesTableName}
      WHERE id = ?;
    `;
    const rows = await this.__query(query, [id]);
    if (!Array.isArray(rows) || rows?.length !== 1) return undefined;

    return this.__addImageUrl(rows[0]);
  },

  delete: async function (id) {
    await this.ready;
    const query = `
      DELETE FROM ${this.qrCodesTableName}
      WHERE id = ?;
    `;
    await this.__query(query, [id]);
    return true;
  },

  /* The destination URL for a QR code is generated at query time */
  generateQrcodeDestinationUrl: function (qrcode) {
    return `${Shopify.Context.HOST_SCHEME}://${Shopify.Context.HOST_NAME}/qrcodes/${qrcode.id}/scan`;
  },

  /* The behavior when a QR code is scanned */
  handleCodeScan: async function (qrcode) {

    /* Log the scan in the database */
    await this.__increaseScanCount(qrcode);

    const url = new URL(qrcode.shopDomain);
    switch (qrcode.destination) {

      /* The QR code redirects to the product view */
      case "product":
        return this.__goToProductView(url, qrcode);

      /* The QR code redirects to checkout */
      case "checkout":
        return this.__goToProductCheckout(url, qrcode);

      default:
        throw `Unrecognized destination "${qrcode.destination}"`;
    }
  },

  // Private

  /*
    Used to check whether to create the database.
    Also used to make sure the database and table are set up before the server starts.
  */

  __hasQrCodesTable: async function () {
    const query = `
      SELECT name FROM sqlite_schema
      WHERE
        type = 'table' AND
        name = ?;
    `;
    const rows = await this.__query(query, [this.qrCodesTableName]);
    return rows.length === 1;
  },

  /* Initializes the connection with the app's sqlite3 database */
  init: async function () {

    /* Initializes the connection to the database */
    this.db = this.db ?? new sqlite3.Database(DEFAULT_DB_FILE);

    const hasQrCodesTable = await this.__hasQrCodesTable();

    if (hasQrCodesTable) {
      this.ready = Promise.resolve();

    /* Create the QR code table if it hasn't been created */
    } else {
      const query = `
        CREATE TABLE ${this.qrCodesTableName} (
          id INTEGER PRIMARY KEY AUTOINCREMENT NOT NULL,
          shopDomain VARCHAR(511) NOT NULL,
          title VARCHAR(511) NOT NULL,
          productId VARCHAR(255) NOT NULL,
          variantId VARCHAR(255) NOT NULL,
          handle VARCHAR(255) NOT NULL,
          discountId VARCHAR(255) NOT NULL,
          discountCode VARCHAR(255) NOT NULL,
          destination VARCHAR(255) NOT NULL,
          scans INTEGER,
          createdAt DATETIME NOT NULL DEFAULT (datetime(CURRENT_TIMESTAMP, 'localtime'))
        )
      `;

      /* Tell the various CRUD methods that they can execute */
      this.ready = this.__query(query);
    }
  },

  /* Perform a query on the database. Used by the various CRUD methods. */
  __query: function (sql, params = []) {
    return new Promise((resolve, reject) => {
      this.db.all(sql, params, (err, result) => {
        if (err) {
          reject(err);
          return;
        }
        resolve(result);
      });
    });
  },

  __addImageUrl: function (qrcode) {
    try {
      qrcode.imageUrl = this.__generateQrcodeImageUrl(qrcode);
    } catch (err) {
      console.error(err);
    }

    return qrcode;
  },

  __generateQrcodeImageUrl: function (qrcode) {
    return `${Shopify.Context.HOST_SCHEME}://${Shopify.Context.HOST_NAME}/qrcodes/${qrcode.id}/image`;
  },

  __increaseScanCount: async function (qrcode) {
    const query = `
      UPDATE ${this.qrCodesTableName}
      SET scans = scans + 1
      WHERE id = ?
    `;
    await this.__query(query, [qrcode.id]);
  },

  __goToProductView: function (url, qrcode) {
    return productViewURL({
      discountCode: qrcode.discountCode,
      host: url.toString(),
      productHandle: qrcode.handle,
    });
  },

  __goToProductCheckout: function (url, qrcode) {
    return productCheckoutURL({
      discountCode: qrcode.discountCode,
      host: url.toString(),
      variantId: qrcode.variantId,
      quantity: DEFAULT_PURCHASE_QUANTITY,
    });
  },
};

/* Generate the URL to a product page */
function productViewURL({ host, productHandle, discountCode }) {
  const url = new URL(host);
  const productPath = `/products/${productHandle}`;

  /* If this QR Code has a discount code, then add it to the URL */
  if (discountCode) {
    url.pathname = `/discount/${discountCode}`;
    url.searchParams.append("redirect", productPath);

  } else {
    url.pathname = productPath;
  }

  return url.toString();
}

/* Generate the URL to checkout with the product in the cart */
function productCheckoutURL({
  host,
  variantId,
  quantity = 1,
  discountCode,
}) {
  const url = new URL(host);
  const id = variantId.replace(
    /gid:\/\/shopify\/ProductVariant\/([0-9]+)/,
    "$1"
  );

  /* The cart URL resolves to a checkout URL */
  url.pathname = `/cart/${id}:${quantity}`;

  if (discountCode) {
    url.searchParams.append("discount", discountCode);
  }

  return url.toString();
}
SQLがわかれば書いてある処理は難なく理解できるかと思います。
APIレイヤーを追加する
DBを構成できたので、フロントエンドがデータにアクセスできるようにAPIレイヤーを追加します。
// webディレクトリで実行してください
$ touch helpers/qr-codes.js
次のコードをqr-codes.jsに記載してください。
import { Shopify } from "@shopify/shopify-api";

import { QRCodesDB } from "../qr-codes-db.js";

const QR_CODE_ADMIN_QUERY = `
  query nodes($ids: [ID!]!) {
    nodes(ids: $ids) {
      ... on Product {
        id
        handle
        title
        images(first: 1) {
          edges {
            node {
              url
            }
          }
        }
      }
      ... on ProductVariant {
        id
      }
      ... on DiscountCodeNode {
        id
      }
    }
  }
`;

export async function getQrCodeOr404(req, res, checkDomain = true) {
  try {
    const response = await QRCodesDB.read(req.params.id);
    if (
      response === undefined ||
      (checkDomain &&
        (await getShopUrlFromSession(req, res)) !== response.shopDomain)
    ) {
      res.status(404).send();
    } else {
      return response;
    }
  } catch (error) {
    res.status(500).send(error.message);
  }

  return undefined;
}

export async function getShopUrlFromSession(req, res) {
  const session = await Shopify.Utils.loadCurrentSession(req, res, true);
  return `https://${session.shop}`;
}

/*
Expect body to contain
title: string
productId: string
variantId: string
handle: string
discountId: string
discountCode: string
destination: string
*/
export async function parseQrCodeBody(req, res) {
  return {
    title: req.body.title,
    productId: req.body.productId,
    variantId: req.body.variantId,
    handle: req.body.handle,
    discountId: req.body.discountId,
    discountCode: req.body.discountCode,
    destination: req.body.destination,
  };
}

/*
  Replaces the productId with product data queried from the Shopify GraphQL Admin API
*/
export async function formatQrCodeResponse(req, res, rawCodeData) {
  const ids = [];

  /* Get every product, variant and discountID that was queried from the database */
  rawCodeData.forEach(({ productId, discountId, variantId }) => {
    ids.push(productId);
    ids.push(variantId);

    if (discountId) {
      ids.push(discountId);
    }
  });

  /* Instantiate a new GraphQL client to query the Shopify GraphQL Admin API */
  const session = await Shopify.Utils.loadCurrentSession(req, res, true);
  const client = new Shopify.Clients.Graphql(session.shop, session.accessToken);

  /* Query the Shopify GraphQL Admin API */
  const adminData = await client.query({
    data: {
      query: QR_CODE_ADMIN_QUERY,

      /* The IDs that are pulled from the app's database are used to query product, variant and discount information */
      variables: { ids },
    },
  });

  /*
    Replace the product, discount and variant IDs with the data fetched using the Shopify GraphQL Admin API.
  */
  const formattedData = rawCodeData.map((qrCode) => {
    const product = adminData.body.data.nodes.find(
      (node) => qrCode.productId === node?.id
    ) || {
      title: "Deleted product",
    };

    const discountDeleted =
      qrCode.discountId &&
      !adminData.body.data.nodes.find((node) => qrCode.discountId === node?.id);

    /*
      A user might create a QR code with a discount code and then later delete that discount code.
      For optimal UX it's important to handle that edge case.
      Use mock data so that the frontend knows how to interpret this QR Code.
    */
    if (discountDeleted) {
      QRCodesDB.update(qrCode.id, {
        ...qrCode,
        discountId: "",
        discountCode: "",
      });
    }

    /*
      Merge the data from the app's database with the data queried from the Shopify GraphQL Admin API
    */
    const formattedQRCode = {
      ...qrCode,
      product,
      discountCode: discountDeleted ? "" : qrCode.discountCode,
    };

    /* Since product.id already exists, productId isn't required */
    delete formattedQRCode.productId;

    return formattedQRCode;
  });

  return formattedData;
}
GraphQLを使って、商品情報、商品のバリアント情報(オプション情報)、ディスカウントコードの情報を取得しています。
取得方法については、基本的にはGraphQLがわかれば理解できると思います。
一部補足説明をします。
セッションの管理で次のコードが記載されてます。
const session = await Shopify.Utils.loadCurrentSession(req, res, true);これは、@shopify/shopify-apiライブラリのShopifyクラスを使いセッションの取得を行なっています。
このセッションには、ストアURLやアクセストークンの情報が含まれています。
アクセストークンはGraphQL API や REST API を使ってShopifyサーバーと通信をするために必要なトークンです。
次のコードはGraphQLにアクセスするためのクライアントを準備しています。
const client = new Shopify.Clients.Graphql(session.shop, session.accessToken);簡単にセッション情報を取得できる便利なメソッドですが、しっかりと理解し管理するようにしてください。
アクセストークンが漏れるとShopify上のデータを書き換えられてしまうので、絶対にアクセストークンが漏れるようなことはしないようにしましょう。
フロントエンドからのAPIリクエストを処理するミドルウェア
(ミドルウェアが何かわからない場合は、nodejs ミドルウェアなどでググるといいと思います)
// webディレクトリで実行してください。
$ touch middleware/qr-code-api.js
次のコードをqr-code-api.jsに記載してください。
/*
  The custom REST API to support the app frontend.
  Handlers combine application data from qr-codes-db.js with helpers to merge the Shopify GraphQL Admin API data.
  The Shop is the Shop that the current user belongs to. For example, the shop that is using the app.
  This information is retrieved from the Authorization header, which is decoded from the request.
  The authorization header is added by App Bridge in the frontend code.
*/

import { QRCodesDB } from "../qr-codes-db.js";
import {
  getQrCodeOr404,
  getShopUrlFromSession,
  parseQrCodeBody,
  formatQrCodeResponse,
} from "../helpers/qr-codes.js";

export default function applyQrCodeApiEndpoints(app) {
  app.post("/api/qrcodes", async (req, res) => {
    try {
      const id = await QRCodesDB.create({
        ...(await parseQrCodeBody(req)),

        /* Get the shop from the authorization header to prevent users from spoofing the data */
        shopDomain: await getShopUrlFromSession(req, res),
      });
      const response = await formatQrCodeResponse(req, res, [
        await QRCodesDB.read(id),
      ]);
      res.status(201).send(response[0]);
    } catch (error) {
      res.status(500).send(error.message);
    }
  });

  app.patch("/api/qrcodes/:id", async (req, res) => {
    const qrcode = await getQrCodeOr404(req, res);

    if (qrcode) {
      try {
        await QRCodesDB.update(req.params.id, await parseQrCodeBody(req));
        const response = await formatQrCodeResponse(req, res, [
          await QRCodesDB.read(req.params.id),
        ]);
        res.status(200).send(response[0]);
      } catch (error) {
        res.status(500).send(error.message);
      }
    }
  });

  app.get("/api/qrcodes", async (req, res) => {
    try {
      const rawCodeData = await QRCodesDB.list(
        await getShopUrlFromSession(req, res)
      );

      const response = await formatQrCodeResponse(req, res, rawCodeData);
      res.status(200).send(response);
    } catch (error) {
      res.status(500).send(error.message);
    }
  });

  app.get("/api/qrcodes/:id", async (req, res) => {
    const qrcode = await getQrCodeOr404(req, res);

    if (qrcode) {
      const formattedQrCode = await formatQrCodeResponse(req, res, [qrcode]);
      res.status(200).send(formattedQrCode[0]);
    }
  });

  app.delete("/api/qrcodes/:id", async (req, res) => {
    const qrcode = await getQrCodeOr404(req, res);

    if (qrcode) {
      await QRCodesDB.delete(req.params.id);
      res.status(200).send();
    }
  });
}
バックエンド側のエンドポイントを設定しており、ルーティングとコントローラーのような処理を行なっています。
実際にDBとの接続を行うのは、helpersディレクトリに構築する関数で処理を書いていきます。
DBとAPIエンドポイントをサーバーに接続する
サーバー構成を更新して、新しいデータベース構成とAPIエンドポイントを使用します。
web/index.jsを次のように変更してください。
// @ts-check
import { join } from "path";
import fs from "fs";
import express from "express";
import cookieParser from "cookie-parser";
import { Shopify, ApiVersion } from "@shopify/shopify-api";

import applyAuthMiddleware from "./middleware/auth.js";
import verifyRequest from "./middleware/verify-request.js";
import { setupGDPRWebHooks } from "./gdpr.js";
import { BillingInterval } from "./helpers/ensure-billing.js";
import applyQrCodeApiEndpoints from "./middleware/qr-code-api.js";
import { QRCodesDB } from "./qr-codes-db.js";

const USE_ONLINE_TOKENS = true;
const TOP_LEVEL_OAUTH_COOKIE = "shopify_top_level_oauth";

const PORT = parseInt(process.env.BACKEND_PORT || process.env.PORT, 10);
const isTest = process.env.NODE_ENV === "test" || !!process.env.VITE_TEST_BUILD;

const versionFilePath = "./version.txt";
let templateVersion = "unknown";
if (fs.existsSync(versionFilePath)) {
  templateVersion = fs.readFileSync(versionFilePath, "utf8").trim();
}

// TODO: There should be provided by env vars
const DEV_INDEX_PATH = `${process.cwd()}/frontend/`;
const PROD_INDEX_PATH = `${process.cwd()}/frontend/dist/`;

const dbFile = join(process.cwd(), "database.sqlite");
const sessionDb = new Shopify.Session.SQLiteSessionStorage(dbFile);
// Initialize SQLite DB
QRCodesDB.db = sessionDb.db;
QRCodesDB.init();

Shopify.Context.initialize({
  API_KEY: process.env.SHOPIFY_API_KEY,
  API_SECRET_KEY: process.env.SHOPIFY_API_SECRET,
  SCOPES: process.env.SCOPES.split(","),
  HOST_NAME: process.env.HOST.replace(/https?:\/\//, ""),
  HOST_SCHEME: process.env.HOST.split("://")[0],
  API_VERSION: ApiVersion.April22,
  IS_EMBEDDED_APP: true,
  SESSION_STORAGE: sessionDb,
});


// Storing the currently active shops in memory will force them to re-login when your server restarts. You should
// persist this object in your app.
const ACTIVE_SHOPIFY_SHOPS = {};
Shopify.Webhooks.Registry.addHandler("APP_UNINSTALLED", {
  path: "/api/webhooks",
  webhookHandler: async (topic, shop, body) =>
    delete ACTIVE_SHOPIFY_SHOPS[shop],
});

// The transactions with Shopify will always be marked as test transactions, unless NODE_ENV is production.
// See the ensureBilling helper to learn more about billing in this template.
const BILLING_SETTINGS = {
  required: false,
  // This is an example configuration that would do a one-time charge for $5 (only USD is currently supported)
  // chargeName: "My Shopify One-Time Charge",
  // amount: 5.0,
  // currencyCode: "USD",
  // interval: BillingInterval.OneTime,
};

// This sets up the mandatory GDPR webhooks. You’ll need to fill in the endpoint
// in the “GDPR mandatory webhooks” section in the “App setup” tab, and customize
// the code when you store customer data.
//
// More details can be found on shopify.dev:
// https://shopify.dev/apps/webhooks/configuration/mandatory-webhooks
setupGDPRWebHooks("/api/webhooks");

// export for test use only
export async function createServer(
  root = process.cwd(),
  isProd = process.env.NODE_ENV === "production",
  billingSettings = BILLING_SETTINGS
) {
  const app = express();
  app.set("top-level-oauth-cookie", TOP_LEVEL_OAUTH_COOKIE);
  app.set("active-shopify-shops", ACTIVE_SHOPIFY_SHOPS);
  app.set("use-online-tokens", USE_ONLINE_TOKENS);

  app.use(cookieParser(Shopify.Context.API_SECRET_KEY));

  applyAuthMiddleware(app, {
    billing: billingSettings,
  });

  app.post("/api/webhooks", async (req, res) => {
    try {
      await Shopify.Webhooks.Registry.process(req, res);
      console.log(`Webhook processed, returned status code 200`);
    } catch (error) {
      console.log(`Failed to process webhook: ${error}`);
      if (!res.headersSent) {
        res.status(500).send(error.message);
      }
    }
  });

  // All endpoints after this point will require an active session
  app.use(
    "/api/*",
    verifyRequest(app, {
      billing: billingSettings,
    })
  );

  app.get("/api/products-count", async (req, res) => {
    const session = await Shopify.Utils.loadCurrentSession(req, res, true);
    const { Product } = await import(
      `@shopify/shopify-api/dist/rest-resources/${Shopify.Context.API_VERSION}/index.js`
    );

    const countData = await Product.count({ session });
    res.status(200).send(countData);
  });

  app.post("/api/graphql", async (req, res) => {
    try {
      const response = await Shopify.Utils.graphqlProxy(req, res);
      res.status(200).send(response.body);
    } catch (error) {
      res.status(500).send(error.message);
    }
  });

  app.use(express.json());
  applyQrCodeApiEndpoints(app);

  app.use((req, res, next) => {
    const shop = req.query.shop;
    if (Shopify.Context.IS_EMBEDDED_APP && shop) {
      res.setHeader(
        "Content-Security-Policy",
        `frame-ancestors https://${shop} https://admin.shopify.com;`
      );
    } else {
      res.setHeader("Content-Security-Policy", `frame-ancestors 'none';`);
    }
    console.log(`Content-Security-Policy: ${res.getHeader("Content-Security-Policy")}`);
    next();
  });

  if (isProd) {
    const compression = await import("compression").then(
      ({ default: fn }) => fn
    );
    const serveStatic = await import("serve-static").then(
      ({ default: fn }) => fn
    );
    app.use(compression());
    app.use(serveStatic(PROD_INDEX_PATH));
  }

  app.use("/*", async (req, res, next) => {
    const shop = req.query.shop;

    // Detect whether we need to reinstall the app, any request from Shopify will
    // include a shop in the query parameters.
    if (app.get("active-shopify-shops")[shop] === undefined && shop) {
      res.redirect(`/api/auth?shop=${shop}`);
    } else {
      // res.set('X-Shopify-App-Nothing-To-See-Here', '1');
      const fs = await import("fs");
      const fallbackFile = join(
        isProd ? PROD_INDEX_PATH : DEV_INDEX_PATH,
        "index.html"
      );
      res
        .status(200)
        .set("Content-Type", "text/html")
        .send(fs.readFileSync(fallbackFile));
    }
  });

  return { app };
}

if (!isTest) {
  createServer().then(({ app }) => app.listen(PORT));
}
実際のところOAuth、Webhook、セッショントークンなど非常に重要なポイントが盛りだくさんで、これを解説するだけでも1時間かかってしまいそうです。
OAuthとセッショントークンなどについては公式ドキュメントに解説を任せたいと思います。
Webhookについてはこちらです。
ざっくり解説すると、このコードは初期設定とサーバーの立ち上げ処理を行なっています。
一度構築してしまえばあまり変更することはないかと思います。
実際のところ、上記のコードを変更せずメインロジックだけ開発していくのが効率的でしょう。
ただ個人的には、上記の部分をしっかり理解しないとちょっとエラーが起きた時に原因究明できず、結局開発が難航することになるのではないかと感じます。
上記リンクをしっかり熟読してShopifyアプリのサーバーの立ち上げの流れを理解しましょう。
とにもかくにも、これでバックエンドの準備が完了です!
データのフェッチ
バックエンドの準備ができたところで、データの取得を行っていきましょう。
データをフェッチするには、useAppQueryを使います。
この useAppQuery は、次の機能を持っています。
- App Bridgeを使用して、リクエストがセッショントークンで認証されていることを確認する
- useQueryで認証されたフェッチメソッドとオプションを渡す
まずは、編集ページをカスタマイズしていきます。
import { Card, Page, Layout, SkeletonBodyText } from '@shopify/polaris'
import { Loading, TitleBar } from '@shopify/app-bridge-react'
import { QRCodeForm } from '../../components'
import { useParams } from 'react-router-dom'
import { useAppQuery } from '../../hooks'

export default function QRCodeEdit() {
  const breadcrumbs = [{content: 'QR codes', url: '/' }]

  const { id } = useParams()

  /*
    Fetch the QR code.
    useAppQuery uses useAuthenticatedQuery from App Bridge to authenticate the request.
    The backend supplements app data with data queried from the Shopify GraphQL Admin API.
  */
  const {
    data: QRCode,
    isLoading,
    isRefetching,
  } = useAppQuery({
    url: `/api/qrcodes/${id}`,
    reactQueryOptions: {
      /* Disable refetching because the QRCodeForm component ignores changes to its props */
      refetchOnReconnect: false,
    },
  })


  /* Loading action and markup that uses App Bridge and Polaris components */
  if (isLoading || isRefetching) {
    return (
      <Page>
        <TitleBar title="Edit QR code" breadcrumbs={breadcrumbs} primaryAction={null} />
        <Loading />
        <Layout>
          <Layout.Section>
            <Card sectioned title="Title">
              <SkeletonBodyText />
            </Card>
            <Card title="Product">
              <Card.Section>
                <SkeletonBodyText lines={1} />
              </Card.Section>
              <Card.Section>
                <SkeletonBodyText lines={3} />
              </Card.Section>
            </Card>
            <Card sectioned title="Discount">
              <SkeletonBodyText lines={2} />
            </Card>
          </Layout.Section>
          <Layout.Section secondary>
            <Card sectioned title="QR code" />
          </Layout.Section>
        </Layout>
      </Page>
    )
  }

  return (
    <Page>
      <TitleBar title="Edit QR code" breadcrumbs={breadcrumbs} primaryAction={null} />
      <QRCodeForm QRCode={QRCode} />
    </Page>
  )
}
useAppQueryを使って、フロント側からバックエンド側へ接続し、データをフェッチしていることがわかります。
フェッチしたデータをQRCodeFormコンポーネントを送り、登録したデータを表示できるようになります。
コメントにも書いていますが、useAppQueryはAppBridgeのuseAuthenticatedQueryを使用してリクエストを認証する機能を持っています。
バックエンドは、Shopify GraphQLAdminAPIからクエリされたデータでアプリデータを補完します。
QRコードを保存する
QRコードを保存できるように変更しましょう。
/web/frontend/pages/qrcodes/[id].jsx を編集していきます。
追加するコード、編集するコードのみ記載していきます。
まずは下記の読み込みを追加します。
import { useParams } from 'react-router-dom'
import { useAppQuery } from '../../hooks'
次に、下記のコードを削除し、次のコードに置き換えます。
削除
/*
    These are mock values.
    Set isLoading to false to preview the page without loading markup.
*/
const isLoading = true
const isRefetching = false
const QRCode = {
  createdAt: '2022-06-13',
  destination: 'checkout',
  title: 'My first QR code',
  product: {}
}
置き換え後
const { id } = useParams()

/*
  Fetch the QR code.
  useAppQuery uses useAuthenticatedQuery from App Bridge to authenticate the request.
  The backend supplements app data with data queried from the Shopify GraphQL Admin API.
*/
const {
  data: QRCode,
  isLoading,
  isRefetching,
} = useAppQuery({
  url: `/api/qrcodes/${id}`,
  reactQueryOptions: {
    /* Disable refetching because the QRCodeForm component ignores changes to its props */
    refetchOnReconnect: false,
  },
})
これでデータの取得ロジックが完了です。
QRコードの保存
QRコードの保存は/web/frontend/components/QRCodeForm.jsxを書き換えます。
削除
const onSubmit = (body) => console.log('submit', body)置き換え
const onSubmit = useCallback(
  (body) => {
    ;(async () => {
      const parsedBody = body
      parsedBody.destination = parsedBody.destination[0]
      const QRCodeId = QRCode?.id
      /* construct the appropriate URL to send the API request to based on whether the QR code is new or being updated */
      const url = QRCodeId ? `/api/qrcodes/${QRCodeId}` : '/api/qrcodes'
      /* a condition to select the appropriate HTTP method: PATCH to update a QR code or POST to create a new QR code */
      const method = QRCodeId ? 'PATCH' : 'POST'
      /* use (authenticated) fetch from App Bridge to send the request to the API and, if successful, clear the form to reset the ContextualSaveBar and parse the response JSON */
      const response = await fetch(url, {
        method,
        body: JSON.stringify(parsedBody),
        headers: { 'Content-Type': 'application/json' },
      })
      if (response.ok) {
        makeClean()
        const QRCode = await response.json()
        /* if this is a new QR code, then save the QR code and navigate to the edit page; this behavior is the standard when saving resources in the Shopify admin */
        if (!QRCodeId) {
          navigate(`/qrcodes/${QRCode.id}`)
          /* if this is a QR code update, update the QR code state in this component */
        } else {
          setQRCode(QRCode)
        }
      }
    })()
    return { status: 'success' }
  },
  [QRCode, setQRCode]
)
見ればわかると思いますが、onSubmitはparseBodyを対象のエンドポイントへ送信しているだけです。
この定数は、新規作成にも編集にも使うため、エンドポイントとHTTPメソッド(PATCHとPOST)は状況に応じて使い分けています。
QRコードの削除
削除は/web/frontend/components/QRCodeForm.jsxの次のコードを置き換えます。
削除
/*
  This is a placeholder function that is triggered when the user hits the "Delete" button.

  It will be replaced by a different function when the frontend is connected to the backend.
*/
const isDeleting = false
const deleteQRCode = () => console.log('delete')
置き換え
const [isDeleting, setIsDeleting] = useState(false)
const deleteQRCode = useCallback(async () => {
  reset()
  /* The isDeleting state disables the download button and the delete QR code button to show the merchant that an action is in progress */
  setIsDeleting(true)
  const response = await fetch(`/api/qrcodes/${QRCode.id}`, {
    method: 'DELETE',
    headers: { 'Content-Type': 'application/json' },
  })

  if (response.ok) {
      navigate(`/`)
  }
}, [QRCode])
割引の処理ロジックを構築
ディスカウント情報にアクセスが必要なため、shopify.app.tomlのscopesにread_discountsを追加します。
shopify.app.toml
# read_discountsを追加
scopes = "write_products,read_discounts"
このファイルの更新は読み込めないので、一旦サーバーを再起動してください。
$ yarn dev次に、/web/frontend/components/QRCodeForm.jsx内でGQLを使って割引情報を取得するコードを構築します。
読み込みでgraphql-requestを追加します。
import { gql } from 'graphql-request'次に、 NO_DISCOUNT_OPTION の下に次のコードを挿入します。
const DISCOUNTS_QUERY = gql`
  query discounts($first: Int!) {
    codeDiscountNodes(first: $first) {
      edges {
        node {
          id
          codeDiscount {
            ... on DiscountCodeBasic {
              codes(first: 1) {
                edges {
                  node {
                    code
                  }
                }
              }
            }
            ... on DiscountCodeBxgy {
              codes(first: 1) {
                edges {
                  node {
                    code
                  }
                }
              }
            }
            ... on DiscountCodeFreeShipping {
              codes(first: 1) {
                edges {
                  node {
                    code
                  }
                }
              }
            }
          }
        }
      }
    }
  }
`
Shopify公式のGraphQL Admin API referenceを見るとわかりますが、ディスカウント情報はいくつかに分岐しています。
上記のコードで使用されているいくつかのディスカウント情報について解説します。
- DiscountCodeBxgy
顧客にX購入、Y取得(BXGY)割引を提供するコード割引。 - DiscountCodeFreeShipping
注文時に送料無料を顧客に提供するコード割引。 - DiscountCodeBasic
特定の製品、コレクション、または注文全体のパーセンテージまたは定額割引を顧客に提供するコード割引。
GraphQL Admin API reference 公式サイト
フロントエンドとバッっくエンドのコードを接続して、割引を表示および選択
/web/frontend/components/QRCodeForm.jsx ファイル内で、一時割引コードを削除して置き換えます。
削除
const isLoadingDiscounts = true;
const discountOptions = [NO_DISCOUNT_OPTION]
置き換え
const {
  data: discounts,
  isLoading: isLoadingDiscounts,
  isError: discountsError,
  /* useShopifyQuery makes a query to `/api/graphql`, which the backend authenticates before proxying it to the Shopify GraphQL Admin API */
} = useShopifyQuery({
  key: 'discounts',
  query: DISCOUNTS_QUERY,
  variables: {
    first: 25,
  },
})

const discountOptions = discounts
  ? [
      NO_DISCOUNT_OPTION,
      ...discounts.data.codeDiscountNodes.edges.map(
        ({ node: { id, codeDiscount } }) => {
          DISCOUNT_CODES[id] = codeDiscount.codes.edges[0].node.code

          return {
            label: codeDiscount.codes.edges[0].node.code,
            value: id,
          }
        }
      ),
    ]
  : []
以上で、QRコードフォーム内で割引を選択したり、QRコードを保存または削除したりできるようになりました。ただし、QRコードを保存しても、QRコード画像自体はまだ生成されません。
これから、画像とスキャンコードのを追加していきます。
リストビューを接続して、保存されたQRコードを表示
コードを表示する時に考慮しなくてはいけないことがキャッシュ戦略です。
毎回DBから全てのデータの取得していたらページの表示速度が遅くなってしまいますし、一方毎回キャッシュしか確認しない場合、更新が反映されなくなってしまいます。
そのため、useAppQueryを使って再検証中の古いキャッシュ戦略を使います。これは、ページの表示に関してはキャッシュを読み取り、裏でデータの再取得を行う方法です。
ページを開いた時にローディングアイコンが表示されるイメージです。
/web/frontend/pages/index.jsxを更新しましょう。
追加
import { useAppQuery } from '../hooks'削除
/*
  These are mock values. Setting these values lets you preview the loading markup and the empty state.
*/
const isLoading = false
const isRefetching = false

/* Mock data to display in the list */
const QRCodes = [
  {
    createdAt: '2022-06-13',
    destination: 'checkout',
    title: 'My first QR code',
    id: 1,
    discountCode: 'SUMMERDISCOUNT',
    product: {
      title: 'Faded t-shirt',
    }
  },
  {
    createdAt: '2022-06-13',
    destination: 'product',
    title: 'My second QR code',
    id: 2,
    discountCode: 'WINTERDISCOUNT',
    product: {
      title: 'Cozy parka',
    }
  },
  {
    createdAt: '2022-06-13',
    destination: 'product',
    title: 'QR code for deleted product',
    id: 3,
    product: {
      title: 'Deleted product',
    }
  },
]
置き換え
const {
  data: QRCodes,
  isLoading,
  isRefetching,
} = useAppQuery({
  url: '/api/qrcodes',
})
QRコード画像のコードを追加する
ここでは、QRコードをプレビュー、ダウンロード、スキャンするためのコードを追加します。
また、公開されるバックエンドAPIをいくつか追加します。
QRコードの生成には、qrcodeという名前のライブラリを使います。
webディレクトリに移動して、qrcodeライブラリを追加します。
$ cd web
$ yarn add qrcode@1.5.0
次にパブリックエンドポイントのファイルを作成します。
/web/middleware/qr-code-public.jsを作成してください。
// webディレクトリで実行してください
$ touch middleware/qr-code-public.js
作成したファイルに次のコードを記載します。
/*
  Merchants need to be able to scan the QR Codes.
  This file provides the publicly available URLs to do that.
*/
import QRCode from "qrcode";

import { QRCodesDB } from "../qr-codes-db.js";
import { getQrCodeOr404 } from "../helpers/qr-codes.js";

export default function applyQrCodePublicEndpoints(app) {
  /*
    The URL for a QR code image.
    The image is generated dynamically so that merhcanges can change the configuration for a QR code.
    This way changes to the QR code won't break the redirection.
  */
  app.get("/qrcodes/:id/image", async (req, res) => {
    const qrcode = await getQrCodeOr404(req, res, false);

    if (qrcode) {
      const destinationUrl = QRCodesDB.generateQrcodeDestinationUrl(qrcode);
      res
        .status(200)
        .set("Content-Type", "image/png")
        .set(
          "Content-Disposition",
          `inline; filename="qr_code_${qrcode.id}.png"`
        )
        .send(await QRCode.toBuffer(destinationUrl));
    }
  });

  /* The URL customers are taken to when they scan the QR code */
  app.get("/qrcodes/:id/scan", async (req, res) => {
    const qrcode = await getQrCodeOr404(req, res, false);

    if (qrcode) {
      res.redirect(await QRCodesDB.handleCodeScan(qrcode));
    }
  });
}
次に、web/index.jsに先ほど作成したファイルを読み込みます。
web/inde.js 追加
import applyQrCodePublicEndpoints from "./middleware/qr-code-public.js";applyAuthMiddleware関数のすぐ下に次のコードを追記します。
applyQrCodePublicEndpoints(app);これでほぼ完成ですが、もう一踏ん張りしましょう!
現在のコードは基本的に、/apiで始まるルートしか想定していません。
/apiで始まらないルートはクライアントによって処理されるため、/qrcodes ルートを処理するためのプロキシルールをいくつか追加します。
web/frontend/vite.config.js を次のように更新します。
※注意:web/vite.config.jsとweb/frontend/vite.config.jsがあるので間違わないように注意してください。
更新前
server: {
  host: process.env.SHOPIFY_VITE_HMR_USE_WSS ? '0.0.0.0' : 'localhost',
  port: process.env.FRONTEND_PORT,
  hmr: hmrConfig,
  proxy: {
    '^/(\\?.*)?$': proxyOptions,
    '^/api(/|(\\?.*)?$)': proxyOptions,
  },
},
更新後
server: {
  host: process.env.SHOPIFY_VITE_HMR_USE_WSS ? '0.0.0.0' : 'localhost',
  port: process.env.FRONTEND_PORT,
  hmr: hmrConfig,
  proxy: {
    '^/(\\?.*)?$': proxyOptions,
    '^/api(/|(\\?.*)?$)': proxyOptions,
    '^/qrcodes/[0-9]+/image(\\?.*)?$': proxyOptions,
    '^/qrcodes/[0-9]+/scan(\\?.*)?$': proxyOptions,
  },
},
これで開発は終了です!
動作テスト
アプリの管理画面をリロードしてみてください。
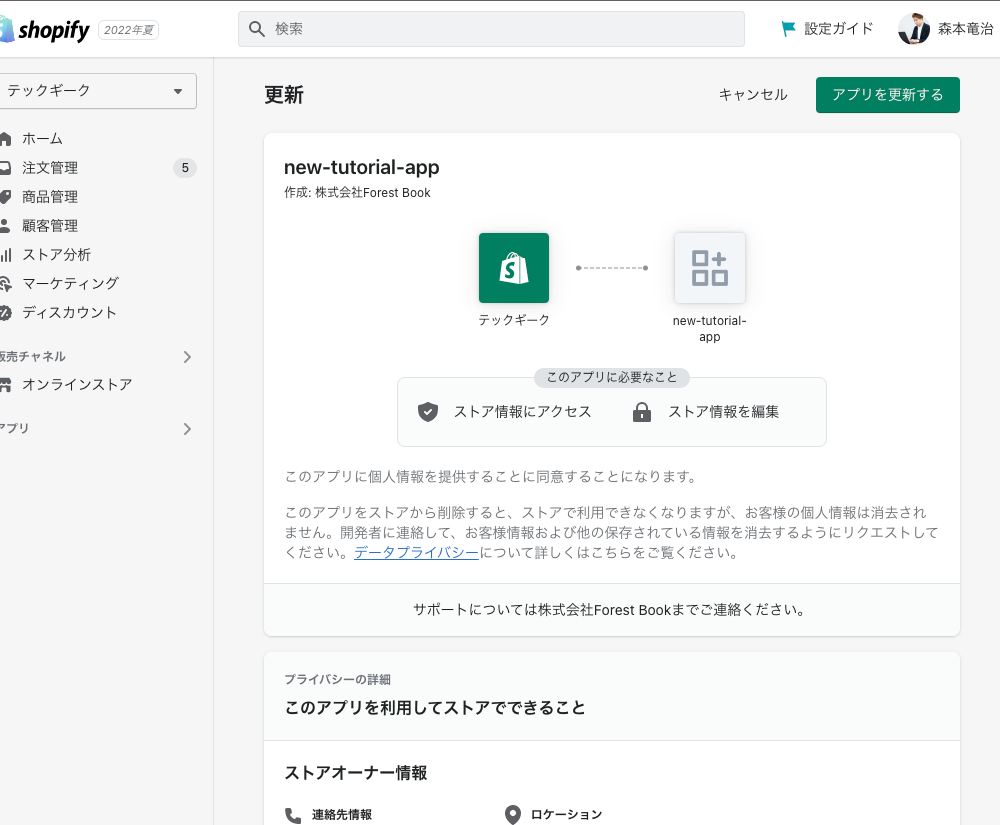
アプリの更新を求められると思います。
これは、スコープに変更を加えたのでマーチャントに追加したスコープを承認するか確認する作業になります。
アプリを更新すれば、ミスがなければ次のように表示されるはずです。
あとはQRコードを作成したり、変更したり、スキャンしたり、削除したりと色々と動作を確認してみましょう!
事前準備として、商品登録とディスカウントの登録を済ませておいてください。
それぞれ5つほど登録しておくといいと思います。
QRコードを使うことで、簡単にクーポンを配布できることがわかったと思います。
以上でチュートリアルは終了です!
お疲れ様でした🎉