最新版2023年度チュートリアルはこちら(2023/09/12)
2023年8月にフレームワークがRemixに変更されました。
最新版を学習されたい方は下記にリンクをご確認ください。

2022年度版チュートリアルはこちら(2022/06/26)

Shopify Unite 2021でShopifyの大規模アップデートがあり、APIドキュメントも刷新されました。
※2022年6月にさらにアップデートがありました。こちらの記事は古くなっている可能性があります。最新版は上記リンクからご確認ください。
新しくなったチュートリアルをさっそく動作確認を行ったので、その内容を徹底解説していきます。
これからShopifyアプリの開発を志している方の参考になれば幸いです。


Shopifyアプリとは?
Shopifyアプリはストアに機能を拡張したり、顧客に独自の購入体験を作成したりするアプリを構築できます。Shopifyストアのデータをアプリ、プラットフォームに利用することもできます。
マーチャントは、特定のニーズに合わせるためにShopifyアプリを使用して、ビジネスの構築、外部サービスとの統合、Shopify管理者への機能の追加を支援します。

Developer(アプリ開発者)とMerchant(ストアの責任者)の関係は、アプリ開発者が提供するアプリをストアの責任者がインストールすることから始まります。ストアの責任者は自身のストアにアプリを通して追加機能を提供し、お客様の購買体験を向上させます。
Shopifyアプリの環境構築
Shopifアプリの環境構築は、非常にシンプルです。このブログでは、Mac OS を前提に解説しますので、Windowsをご利用の方はShopifyドキュメントの参照をお願いいたします。
Shopify CLI をインストール
$ brew tap shopify/shopify
$ brew install shopify-cli
$ shopify version
=> 2.0.2
もし、すでにShopify CLI をインストール済みの方はバージョンが2系になっていることを確認しください。1.4系になっている方は、アップデートしましょう!
※ バージョンが2系になっていない場合
$ brew update
$ brew upgrade shopify-cli
$ brew unlink shopify-cli && brew link --force --overwrite shopify-cli
プロジェクトの作成
Shopify CLIを使ってプロジェクトを作成します。
$ shopify node create --name=アプリ名
アプリ名は、 unite_tutorial にしました。
アプリには公開アプリとカスタムアプリがあります。特定のマーチャント用アプリや開発用にはカスタムアプリを利用します。
カスタムアプリを指定すると、Shopifyパートナーアカウントにログインを求められます。

ログインに成功すると次の画面にリダイレクトします。このページは閉じて問題ありません。

ターミナルに戻るとパートナーアカウントIDが表示されているので、利用するアカウントを選択します。(自分は間違えて作ったものがあるため2つ表示されています)

次に、アプリをテストする開発ストアを選択しましょう。

完了すると次のような表記になります。
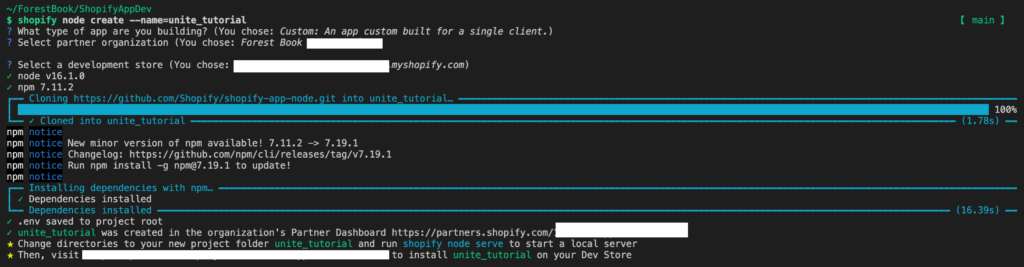
たったこれだけでアプリの作成が完了です!
ちなみに、下記のGitHubのコードをインストールしてアプリの設定をしただけなので、具体的にどんなアプリを作成したのか知りたい!という方はGitHubを参照してください。

ストアにアプリをインストール
アプリのインストール及び動作確認をしていきましょう。アプリの動作には、ngrokというツールを使います。
もし、アカウントを持っていなければ事前に作成してください。

次にプロジェクトディレクトリに移動して、ローカルサーバーで起動させます。
$ cd アプリ名
$ shopify node serve
「yes」を選択するとローカルでサーバーが立ち上がります。
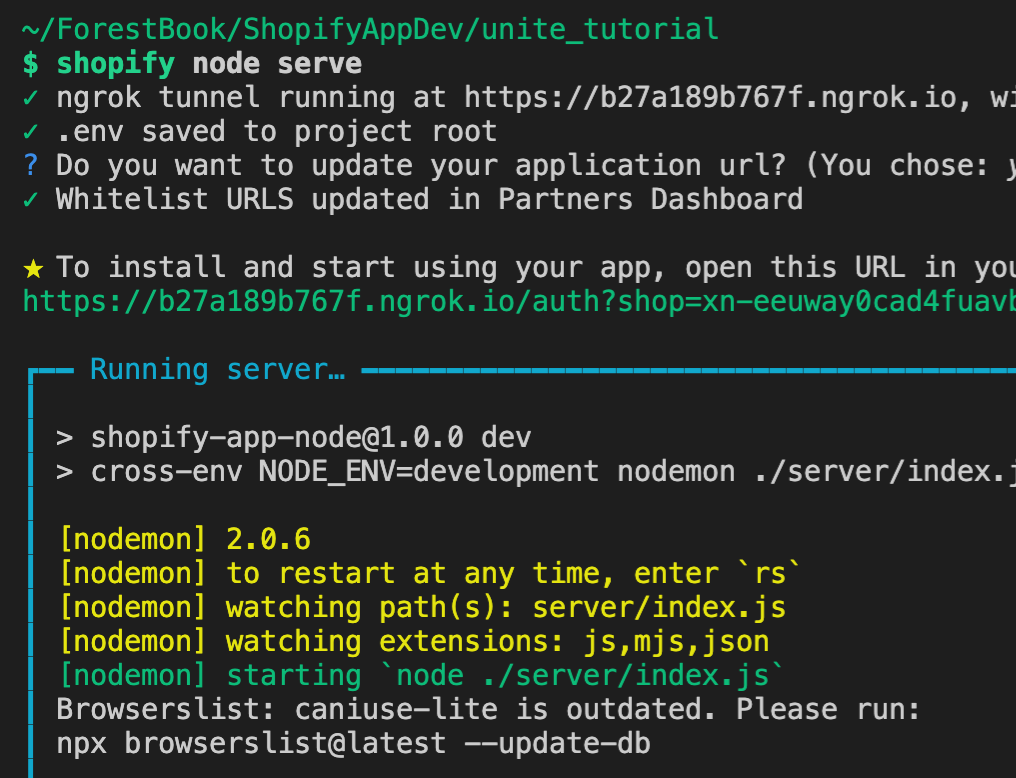
自分の環境だけかもしれませんが npx browserslist@latest --update-db を入力しろと言われているので念のため実行しておきましょう。(このコマンドが何者かはよくわかってないです、はい)
サーバーが起動していればアプリとして利用可能な状態になっています。次に開発ストアへアプリをインストールしましょう。赤枠のURLをコピーしてアクセスします。

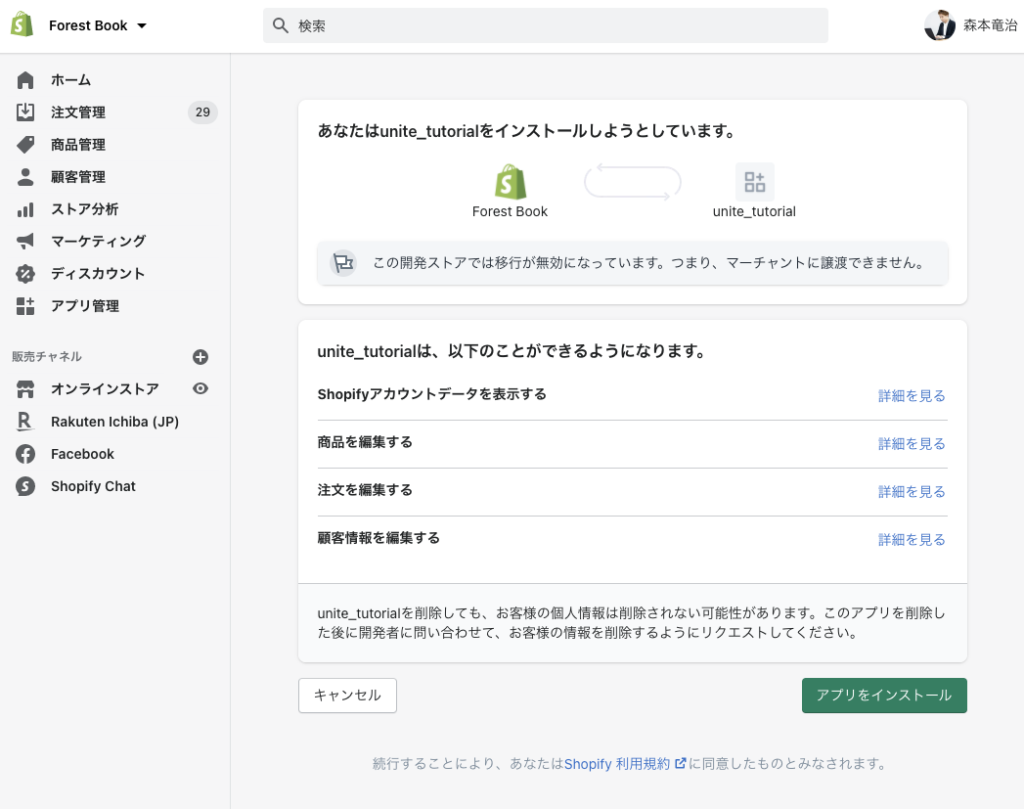
アプリインストール画面が表示されるので、インストールします。
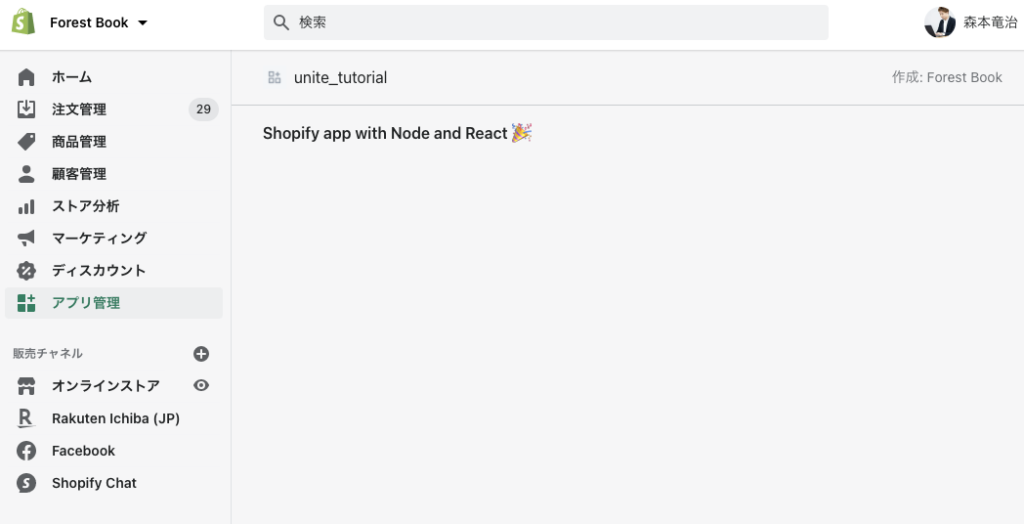
アプリが正常にインストールされれば成功です!
※うまく表示されない場合、一旦アプリを削除してから再インストールを試してみてください。
Shopifyアプリの機能開発
このチュートリアルでは、マーチャントが商品の在庫を管理するための機能を開発します。マーチャントはアプリを使って、商品名、価格など商品情報を登録させます。
在庫管理は、サプライチェーン全体で在庫を整理及び管理するプロセスです。効果的な在庫管理は、企業が顧客の需要を満たすのに十分な在庫を確保するために必要です。
商品を登録する
アプリを使ってダミー商品を登録します。ダミー商品の登録は次のコマンドで行います。
$ shopify populate productsログインしているストアに登録して良いか聞かれるので yes を選択します。

これでダミー商品の登録が完了しました。


フロント側でユーザーインターフェース(UI)を作成
次に、フロントエンドをテストしていきます。ShopifyのReactコンポーネントライブラリ及びデザインシステムにPolarisがあります。Shopifyでは、Polarisを使った開発をすることでShopify全体でデザインの統一性を持たせるようにすることが推奨されています。特に理由がない限り、Polarisを使ってフロントエンドを開発します。

このライブラリを使って、 pages/index.js を編集します。
import { Heading, Page, TextStyle, Layout, EmptyState} from "@shopify/polaris";

const img = 'https://cdn.shopify.com/s/files/1/0757/9955/files/empty-state.svg';

const Index = () => (
  <Page>
    <Layout>
      <EmptyState // Empty state component
        heading="Discount your products temporarily"
        action={{
          content: 'Select products',
          onAction: () => this.setState({ open: true }),
        }}
        image={img}
      >
        <p>Select products to change their price temporarily.</p>
      </EmptyState>
    </Layout>
  </Page>
);

export default Index;
フロント側が変わったか確認するためにアプリを開いて確認します。うまく行っていれば次のような表示になります。
もし、サーバーを落としている場合、 $ shopify node serve を実行してからアクセスしてみてください。
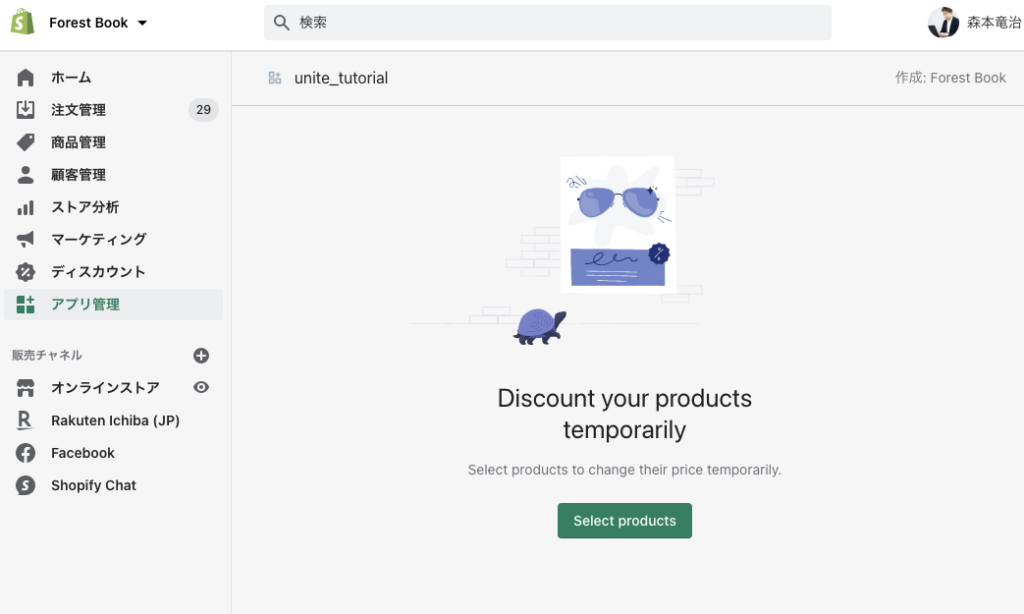
PolarisのEmptyStateコンポーネントに画像を挿入した内容になっています。
商品情報を取得する
商品情報の取得は、Shopify App Bridgeを使います。App Bridgeは、Shopifyライブラリの一つで、管理画面に直接機能を埋め込んだり、アプリの外部でShopify UI 要素をカスタマイズしたりできます。App BridgeのResourcePickerという機能を使って、商品の取得および検索機能を実装できます。
import React from 'react';
import { Heading, Page, TextStyle, Layout, EmptyState} from "@shopify/polaris";
import { ResourcePicker, TitleBar } from '@shopify/app-bridge-react';

const img = 'https://cdn.shopify.com/s/files/1/0757/9955/files/empty-state.svg';

// Sets the state for the resource picker
class Index extends React.Component {
  state = { open: false };
  render() {
    return (
      <Page>
        <TitleBar
          primaryAction={{
            content: 'Select products',
            onAction: () => this.setState({ open: true }),
          }}
        />
        <ResourcePicker // Resource picker component
          resourceType="Product"
          showVariants={false}
          open={this.state.open}
          onSelection={(resources) => this.handleSelection(resources)}
          onCancel={() => this.setState({ open: false })}
        />
        <Layout>
          <EmptyState
            heading="Discount your products temporarily"
            action={{
              content: 'Select products',
              onAction: () => this.setState({ open: true }),
            }}
            image={img}
          >
            <p>Select products to change their price temporarily.</p>
          </EmptyState>
        </Layout>
      </Page>
    );
  }
  handleSelection = (resources) => {
    this.setState({ open: false });
    console.log(resources);
  };
}

export default Index;
ResourcePickerを使うと次のような表示を作ることができます。
@shopify/app-bridge-react に含まれているコンポーネントです。
以下の要素を設定し、カスタマイズします。
resourceType[必須]:Product、ProductVariant、Collection の3つのタイプから選択
showVariants:商品のバリエーションを表示するかどうか。 true, false
open[必須]:ピッカーを表示するかどうか。true, false
onSelection:選択された時のコールバック関数を設定。
onCancel:選択されずピッカーが閉じられた時のコールバック関数を設定。
リソースリストを追加
ResourcePickerに商品リストを取得することはできましたが、詳細情報をアプリに表示させるためにはGraphQL Admin APIからデータを取得する必要があります。
- ResourcePickerを使って商品を選択
- 選択した商品IDを使ってGraphQLから商品詳細情報を取得
- GraphQLから取得した商品詳細情報を表示
この3ステップで商品詳細情報を表示させます。GraphQL AdminAPIについての詳細は下記のリンクを参考にしてください。
ところで、GraphQLから取得した情報を一時的に保持しておく必要があります。データを永続化する時はデータベースに保存しますが、一時的な保存のため、このチュートリアルでは store-js というライブラリを利用しています。 store-js は、ローカルストレージを管理するためのクロスブラウザJavaScriptライブラリです。

まず、store-js をインストールします。サーバーを一旦停止し、下記のコマンドを実行してください。
$ yarn add store-js次に、pages フォルダに components フォルダを作成し、その中に ResourceList.js ファイルを作成し、GraphQLのコードを書いていきます。
$ mkdir pages/components
$ touch pages/components/ResourceList.js
※ このチュートリアルは、Next.jsを使用しているのでディレクトリ構成はNext.jsを学習する必要があります。
作成したResourceList.js ファイルに下記のコードを記載します。
import React from 'react';
import gql from 'graphql-tag';
import { Query } from 'react-apollo';
import {
  Card,
  ResourceList,
  Stack,
  TextStyle,
  Thumbnail,
} from '@shopify/polaris';
import store from 'store-js';
import { Redirect } from '@shopify/app-bridge/actions';
import { Context } from '@shopify/app-bridge-react';
import ApplyRandomPrices from './ApplyRandomPrices';

// GraphQL query that retrieves products by ID
const GET_PRODUCTS_BY_ID = gql`
  query getProducts($ids: [ID!]!) {
    nodes(ids: $ids) {
      ... on Product {
        title
        handle
        descriptionHtml
        id
        images(first: 1) {
          edges {
            node {
              originalSrc
              altText
            }
          }
        }
        variants(first: 1) {
          edges {
            node {
              price
              id
            }
          }
        }
      }
    }
  }
`;

class ResourceListWithProducts extends React.Component {
  static contextType = Context;

  // A constructor that defines selected items and nodes
  constructor(props) {
    super(props);
    this.state = {
      selectedItems: [],
      selectedNodes: {},
    };
  }

  render() {
    const app = this.context;

    // Returns products by ID
    return (
        <Query query={GET_PRODUCTS_BY_ID} variables={{ ids: store.get('ids') }}>
          {({ data, loading, error, refetch }) => { // Refetches products by ID
            if (loading) return <div>Loading…</div>;
            if (error) return <div>{error.message}</div>;

            const nodesById = {};
            data.nodes.forEach(node => nodesById[node.id] = node);

            return (
              <>
                <Card>
                  <ResourceList
                    showHeader
                    resourceName={{ singular: 'Product', plural: 'Products' }}
                    items={data.nodes}
                    selectable
                    selectedItems={this.state.selectedItems}
                    onSelectionChange={selectedItems => {
                      const selectedNodes = {};
                      selectedItems.forEach(item => selectedNodes[item] = nodesById[item]);

                      return this.setState({
                        selectedItems: selectedItems,
                        selectedNodes: selectedNodes,
                      });
                    }}
                    renderItem={item => {
                      const media = (
                        <Thumbnail
                          source={
                            item.images.edges[0]
                              ? item.images.edges[0].node.originalSrc
                              : ''
                          }
                          alt={
                            item.images.edges[0]
                              ? item.images.edges[0].node.altText
                              : ''
                          }
                        />
                      );
                      const price = item.variants.edges[0].node.price;
                      return (
                        <ResourceList.Item
                          id={item.id}
                          media={media}
                          accessibilityLabel={`View details for ${item.title}`}
                          verticalAlignment="center"
                          onClick={() => {
                            let index = this.state.selectedItems.indexOf(item.id);
                            const node = nodesById[item.id];
                            if (index === -1) {
                                this.state.selectedItems.push(item.id);
                                this.state.selectedNodes[item.id] = node;
                            } else {
                              this.state.selectedItems.splice(index, 1);
                                delete this.state.selectedNodes[item.id];
                            }

                            this.setState({
                              selectedItems: this.state.selectedItems,
                              selectedNodes: this.state.selectedNodes,
                              });
                          }}
                        >
                          <Stack alignment="center">
                            <Stack.Item fill>
                              <h3>
                                <TextStyle variation="strong">
                                  {item.title}
                                </TextStyle>
                              </h3>
                            </Stack.Item>
                            <Stack.Item>
                              <p>${price}</p>
                            </Stack.Item>
                          </Stack>
                        </ResourceList.Item>
                      );
                    }}
                  />
                </Card>

              <ApplyRandomPrices selectedItems={this.state.selectedNodes} onUpdate={refetch} />
            </>
          );
        }}
      </Query>
    );
  }
}

export default ResourceListWithProducts;アプリがGraphQLをしようしてデータをクエリできるようにするには、ファイルに、graphql-tag と react-apollo をインポートする必要があります。
ApolloとはGraphQLを簡単に操作するためのライブラリまたはプラットフォームです。 react-apollo は、フロント側で apollo-clientを使えるようにするライブラリになっています。Apolloの公式サイトへのリンクを貼っておくので気になる方はこちらを参考にしてください。

graphql-tag を使うと、文字列をGraphQLのクエリに変換してくれます。 GET_PRODUCTS_BY_ID 定数は商品IDを元に商品詳細情報を取得する GraphQLクエリになっています。
このgraphql-tag と react-apollo を使った処理を見てみます。
<Query query={GET_PRODUCTS_BY_ID} variables={{ ids: store.get('ids') }}>
  {({ data, loading, error, refetch }) => {
...QueryコンポーネントにqueryとしてGET_PRODUCTS_BY_IDを設定することで、GraphQLを実行しています。variablesはGraphQLクエリに変数を渡しています。
この処理が走ると、処理の完了まで第二引数の loading が true になり、処理の完了時点で loading は false になります。
処理が完了すると返り値が、 data に格納されます。 {nodes: [{title: "タイトル", ...}, {...}, ...]} といったJSON形式のデータを取得しています。
同様に処理中にいエラーが起きた場合は、第三引数の error にデータが格納され、エラーがなければ undefined となっています。
取得した data の内容を Polaris の ResourceList コンポーネントを使って表示しています。 ResourceList コンポーネントの items に取得したデータを入れることで、リスト表示されるようになります。
ResourcePickerを使って、データを取得、取得したデータを元にGraphQLから商品詳細情報を取得するところまでできました。最後に、商品情報を取得していれば、リストを表示し、商品情報がなければEmptyStateコンポーネントを表示するようにしましょう。
import React from 'react';
import { Page, Layout, EmptyState} from "@shopify/polaris";
import { ResourcePicker, TitleBar } from '@shopify/app-bridge-react';
import store from 'store-js';
import ResourceListWithProducts from './components/ResourceList';

const img = 'https://cdn.shopify.com/s/files/1/0757/9955/files/empty-state.svg';

class Index extends React.Component {
  state = { open: false };
  render() {
    // A constant that defines your app's empty state
    const emptyState = !store.get('ids');
    return (
      <Page>
        <TitleBar
          primaryAction={{
            content: 'Select products',
            onAction: () => this.setState({ open: true }),
          }}
        />
        <ResourcePicker
          resourceType="Product"
          showVariants={false}
          open={this.state.open}
          onSelection={(resources) => this.handleSelection(resources)}
          onCancel={() => this.setState({ open: false })}
        />
        {emptyState ? ( // Controls the layout of your app's empty state
          <Layout>
            <EmptyState
              heading="Discount your products temporarily"
              action={{
                content: 'Select products',
                onAction: () => this.setState({ open: true }),
              }}
              image={img}
            >
              <p>Select products to change their price temporarily.</p>
            </EmptyState>
          </Layout>
        ) : (
          // Uses the new resource list that retrieves products by IDs
          <ResourceListWithProducts />
        )}
      </Page>
    );
  }
  handleSelection = (resources) => {
    const idsFromResources = resources.selection.map((product) => product.id);
    this.setState({ open: false });
    store.set('ids', idsFromResources);
  };
}

export default Index;soter-jsを使って、商品情報の有無で表示を切り分けるコードになっています。シンプルなコードのため、解説は省略します。
商品の金額を更新
ここまでで、登録してある商品の取得、表示まで完成しました。最後に表示した商品の金額を更新する機能を追加します。
商品の金額をランダムに更新するためのGraphQLクエリを書いていきます。まず、 components フォルダにApplyRandomPrices.js ファイルを作成します。
$ touch pages/components/ApplyRandomPrices.js作成した ApplyRandomPrices.js ファイルに下記のコードを記載します。
import React, { useState } from 'react';
import gql from 'graphql-tag';
import { Mutation } from 'react-apollo';
import { Layout, Button, Banner, Toast, Stack, Frame } from '@shopify/polaris';
import { Context } from '@shopify/app-bridge-react';

// GraphQL mutation that updates the prices of products
const UPDATE_PRICE = gql`
  mutation productVariantUpdate($input: ProductVariantInput!) {
    productVariantUpdate(input: $input) {
      product {
        title
      }
      productVariant {
        id
        price
      }
    }
  }
`;

class ApplyRandomPrices extends React.Component {
  static contextType = Context;

  render() {
    return ( // Uses mutation's input to update product prices
      <Mutation mutation={UPDATE_PRICE}>
        {(handleSubmit, {error, data}) => {
          const [hasResults, setHasResults] = useState(false);

          const showError = error && (
            <Banner status="critical">{error.message}</Banner>
          );

          const showToast = hasResults && (
            <Toast
              content="Successfully updated"
              onDismiss={() => setHasResults(false)}
            />
          );

          return (
            <Frame>
              {showToast}
              <Layout.Section>
                {showError}
              </Layout.Section>

              <Layout.Section>
                <Stack distribution={"center"}>
                  <Button
                    primary
                    textAlign={"center"}
                    onClick={() => {
                      let promise = new Promise((resolve) => resolve());
                      for (const variantId in this.props.selectedItems) {
                        const price = Math.random().toPrecision(3) * 10;
                        const productVariableInput = {
                          id: this.props.selectedItems[variantId].variants.edges[0].node.id,
                          price: price,
                        };

                        promise = promise.then(() => handleSubmit({ variables: { input: productVariableInput }}));
                      }

                      if (promise) {
                        promise.then(() => this.props.onUpdate().then(() => setHasResults(true)));
                    }}
                  }
                  >
                    Randomize prices
                  </Button>
                </Stack>
              </Layout.Section>
            </Frame>
          );
        }}
      </Mutation>
    );
  }
}

export default ApplyRandomPrices;GraphQLクエリを作っているところまでは、ResourceList.jsと同じです。先程は、データの取得を行うため、 Queryコンポーネントを使用しましたが、今回はデータの更新を行うため Mutation コンポーネントを使用します。
Mutationコンポーネントは、第一引数にハンドラー関数を定義し、この関数が実行されたときにGraphQLにmutation(更新)が走ります。その返り値が第二引数 {error, data}に渡されます。
「Randomize prices」ボタンを押すと、ランダムな数値を計算し、ハンドラー関数の引数に渡しています。
以上でコードは完成しました!さっそく動作確認をしてみましょう!
動作確認

ちゃんと、金額が変更されていれば成功です!
感想
Shopifyは頻繁に更新があるため、チュートリアルが最新版では動かないなど、色々課題がありました。しかし、今回はエラーになることもなく、サクッと進むことができたのでかなりストレスフリーで取り組めました!
気になったところをちょっとまとめてみました。(愚痴)
- React Hooks を使ったり、使わなかったり一貫性がないやん
- react-apolloより、@apollo/client の方が使いやすくない?
- 無駄に再レンダリングされてるのが気になる
- Next.js含め、使用しているライブラリの説明がない(見落とし?)
- GraphQLの知識がないと、理解に詰まる
まぁ、好みの問題かもしれませんが、、、。
全体としてはシンプルでわかりやすいチュートリアルだったと思います!
以上、これからShopifyアプリの開発を志している人の参考になれば幸いです。